Administrators: System Settings
The Settings Dashboard is the central hub for controlling your ITAM instance. Here, you can manage how the platform looks and feels, manage users, control data, and perform important management tasks related to forms, users, and reports. It also provides information on the system's state, including active users and existing forms.
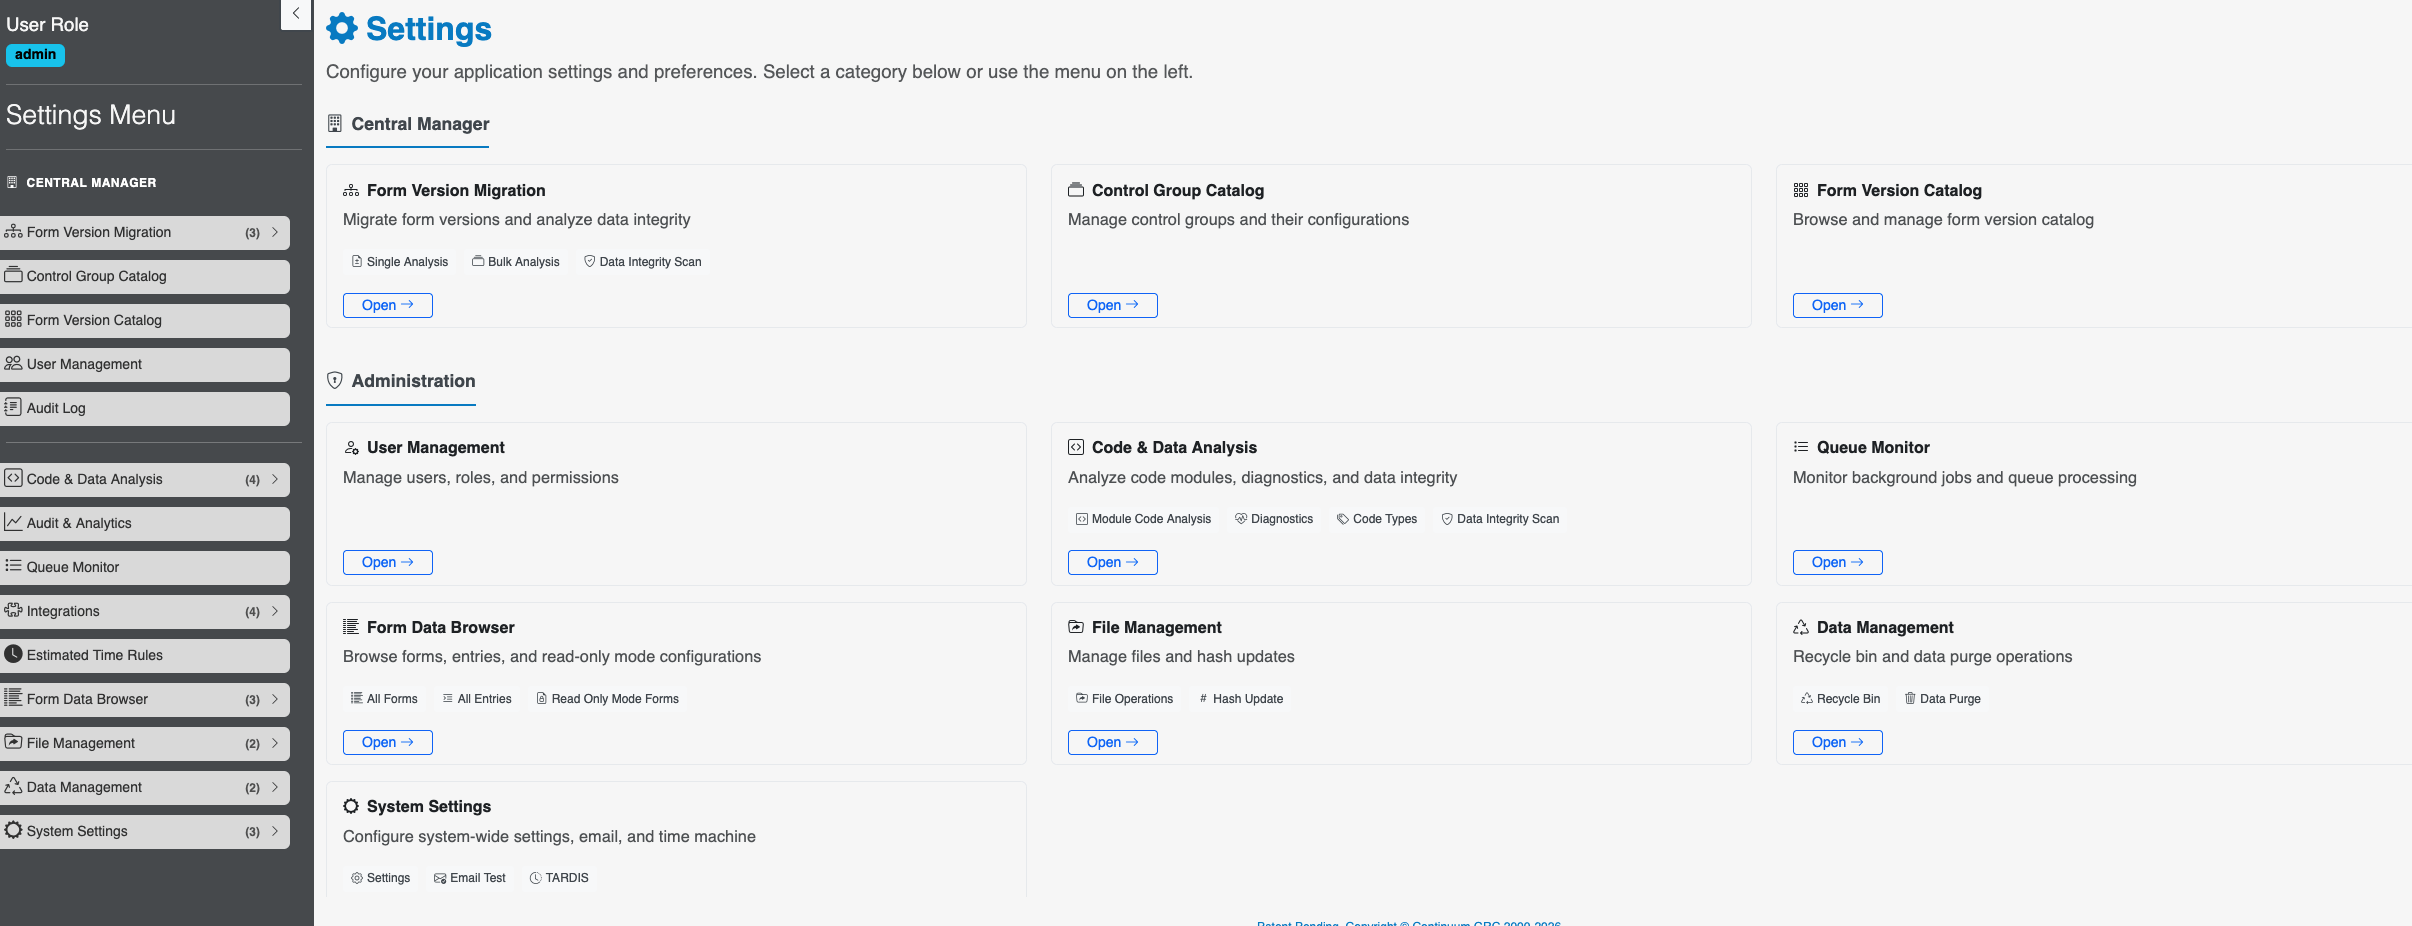
On both the main dashboard page and the side menu, you'll find a list of setting categories that provide administrators with complete control over their systems:
Central Settings Manager
- Form Version Migration: Migrate form versions and analyze data integrity
- Control Group Category: Manage control groups and their configurations
- Form Version Catalog: Browse and manage form version catalog
Administration
- User Management: Manage users, roles, and permissions
- Code and Data Analysis: Analyze code modules, diagnostics, and data integrity
- Queue Monitor: Monitor background jobs and queue processing
- Form Data Browser: Browse forms, entries, and read-only mode configurations
- File Management: Manage files and hash updates
- Data Management: Recycle bin and data purge operations
- System Settings: Configure system-wide settings, email, and Time Machine
Common Settings
- Integrations: Configure third-party integrations and services
- Audit and Analytics: View audit logs and analytics reports
Form Version Migration
Form Version Migration allows administrators to compare local forms against those on remote ITAM instances. This supports data integrity across systems and enables determination of whether structural errors or corruption have occurred.
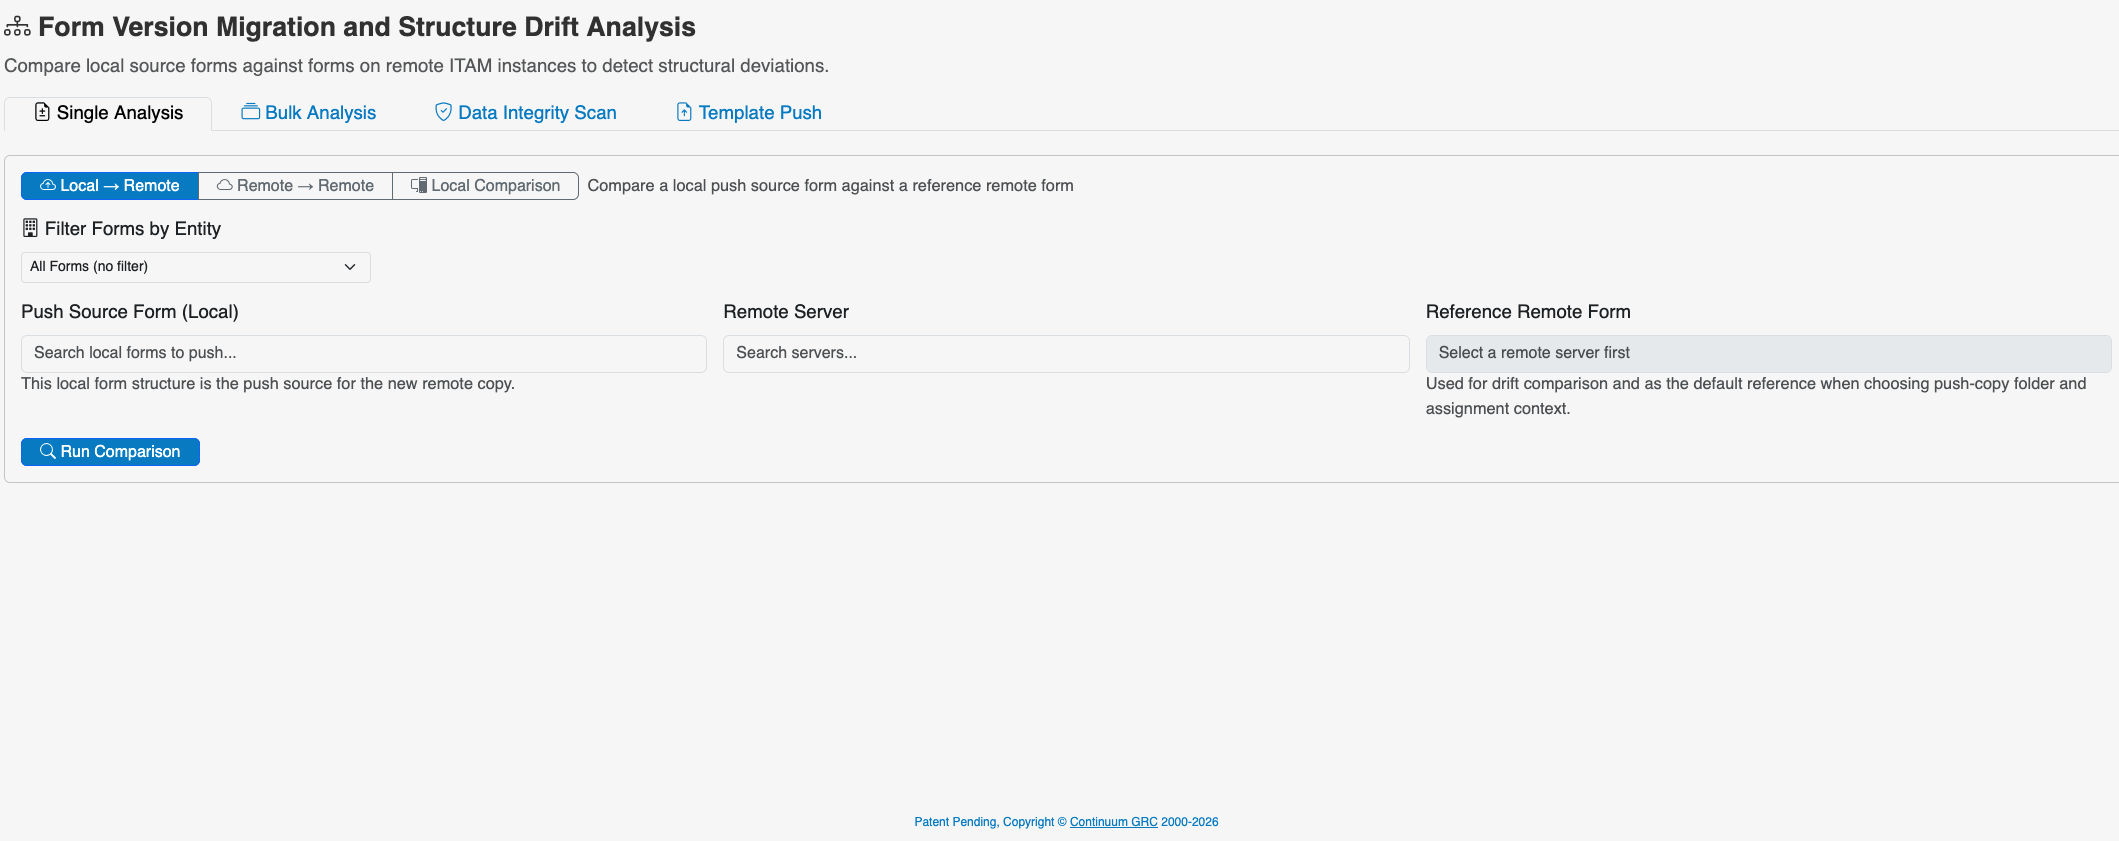
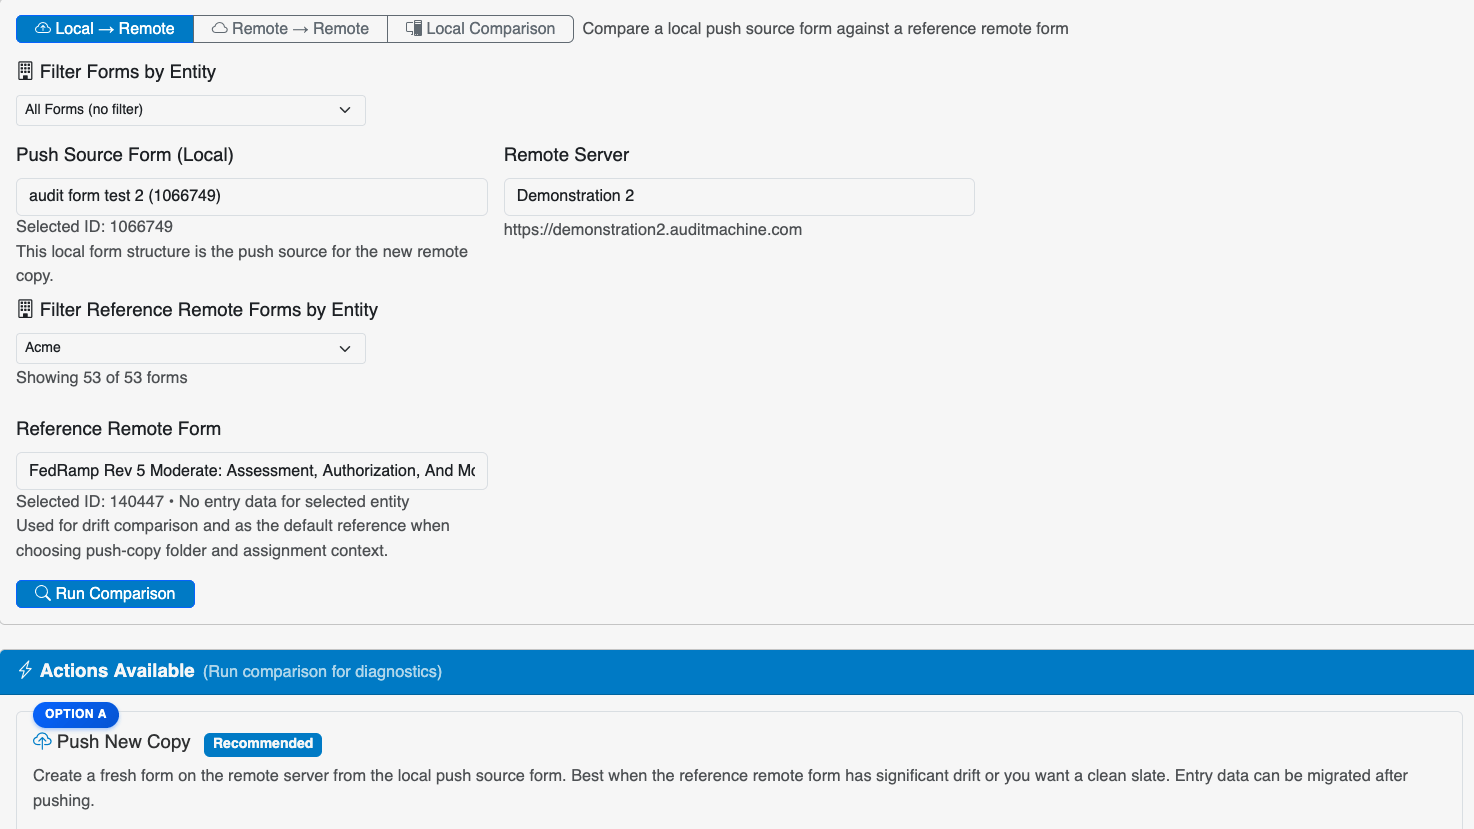
Single Analysis
From this screen, you can connect to a remote form configured for your system. Select a local form, a remote server, and the Entity and Form on that remote server. Following that, you can either Run Comparison to determine key differences, or push your local copy to the remote server so that both forms are identicaly
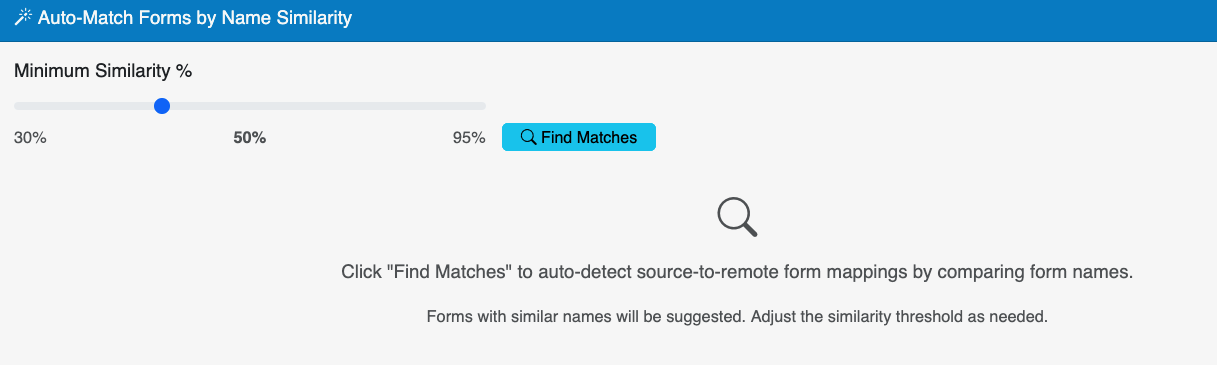
Bulk Analysis
This section allows you to run a bulk comparison of form mappings between two ITAM instances. To use this feature, you must first map local forms to their equivalent form on the remote server, and then start a bulk analysis across those mappings.
If you're unable to manually configure form mappings, you can attempt to automatically map forms using form names across instances. Click the Auto-Match Forms button to start this process. The interface provides a similarity slider across a continuum of similarity — the higher the percentage, the more form names must match to be considered for auto-matching.
Data Integrity Scan
This feature automatically scans all local forms to determine whether they are structurally sound. This means looking for defects such as:
- Orphaned Elements
- Duplicate Positions or Elements
- Duplicate Machine Codes across different Elements
- Elements that are active but are part of deleted control groups
- Other structural issues related to page breaks or control groupings
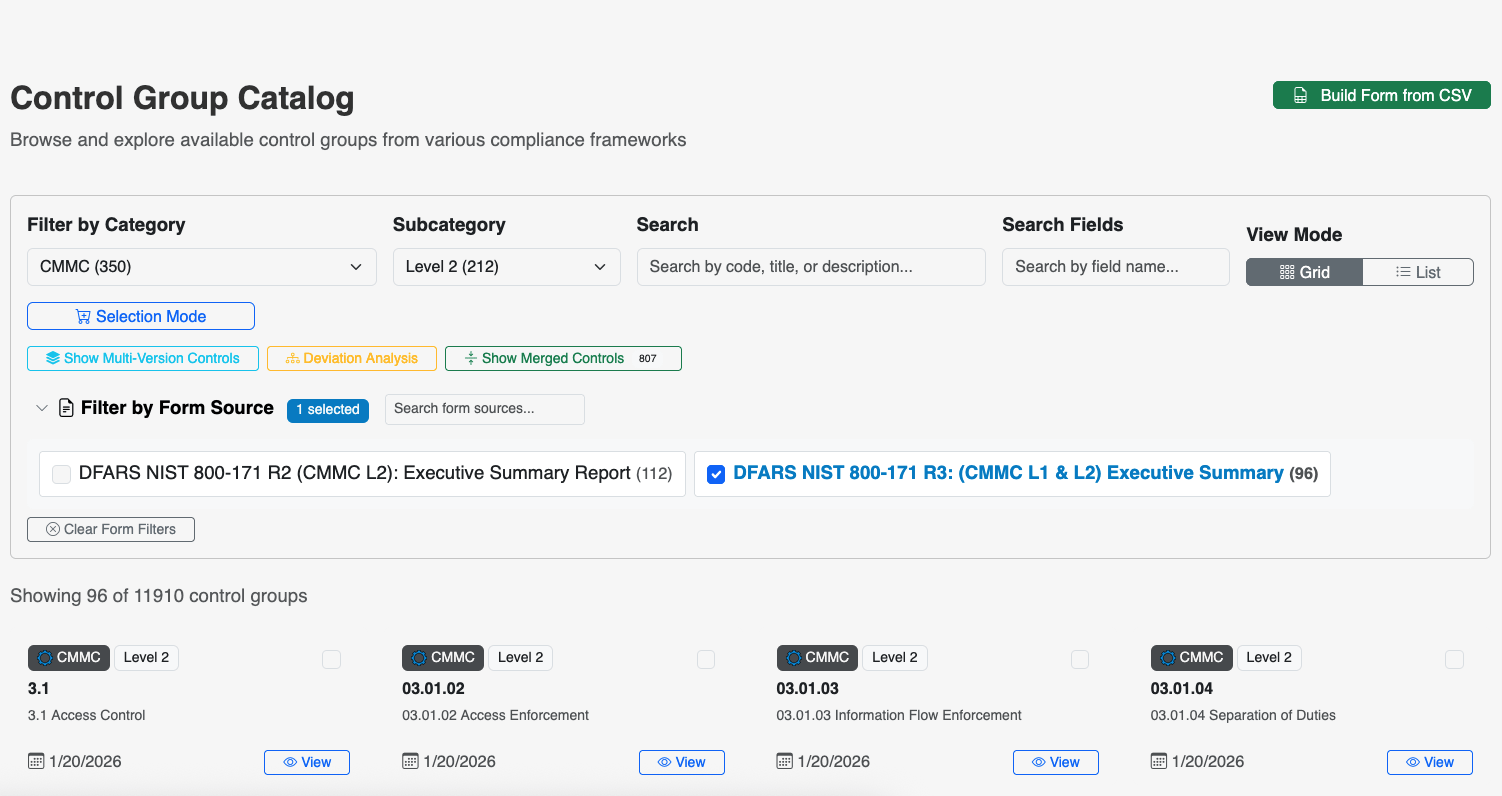
Control Group Category
As the name suggests, this page provides administrators with a search engine for control groups across all forms. Here, you can search for these control groups across all forms based on the compliance standard of your choice. From here, you can view all the control groups as they appear in the forms, and see individual element layouts for specific control groups.
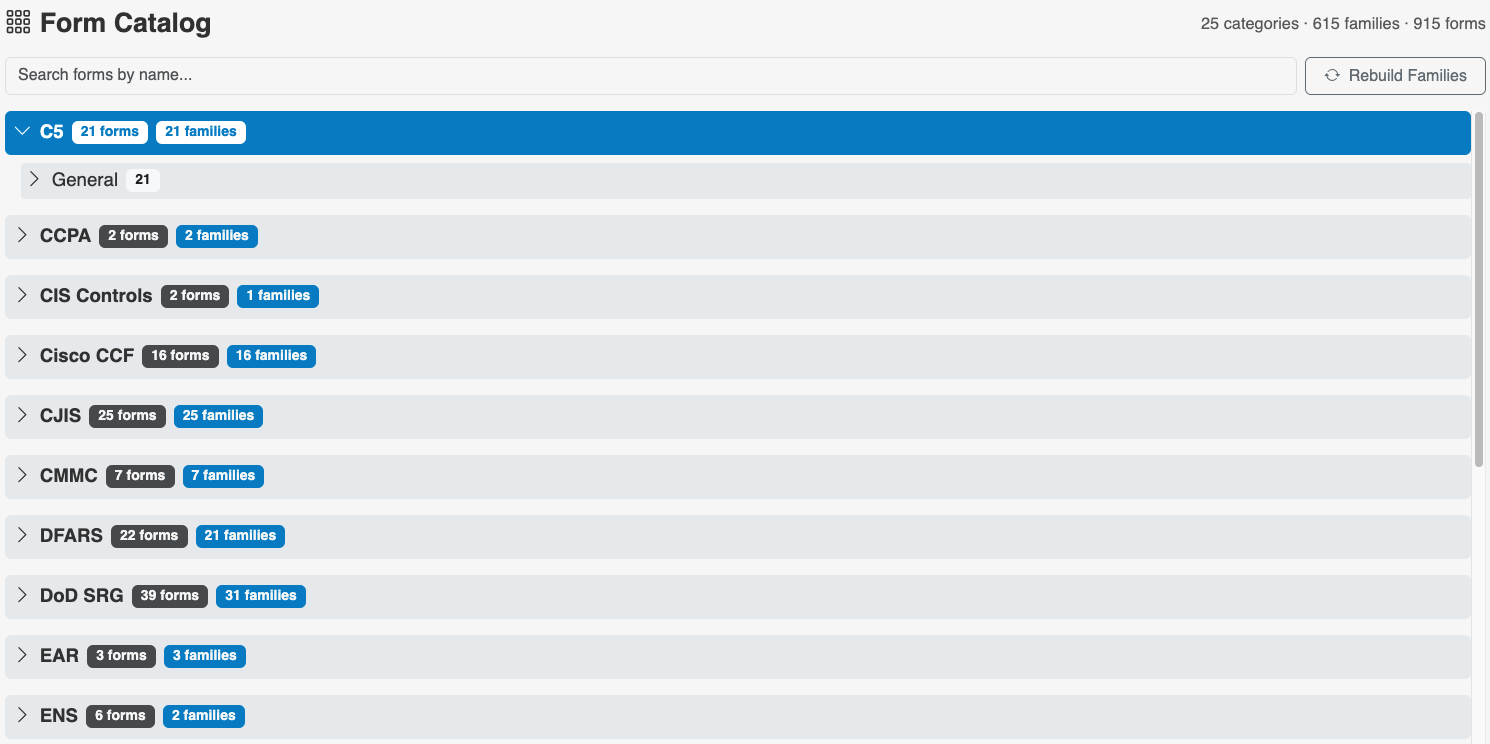
Form Version Catalog
The Form Version Catalog provides a comprehensive, searchable list of all forms and form families in your ITAM instance.
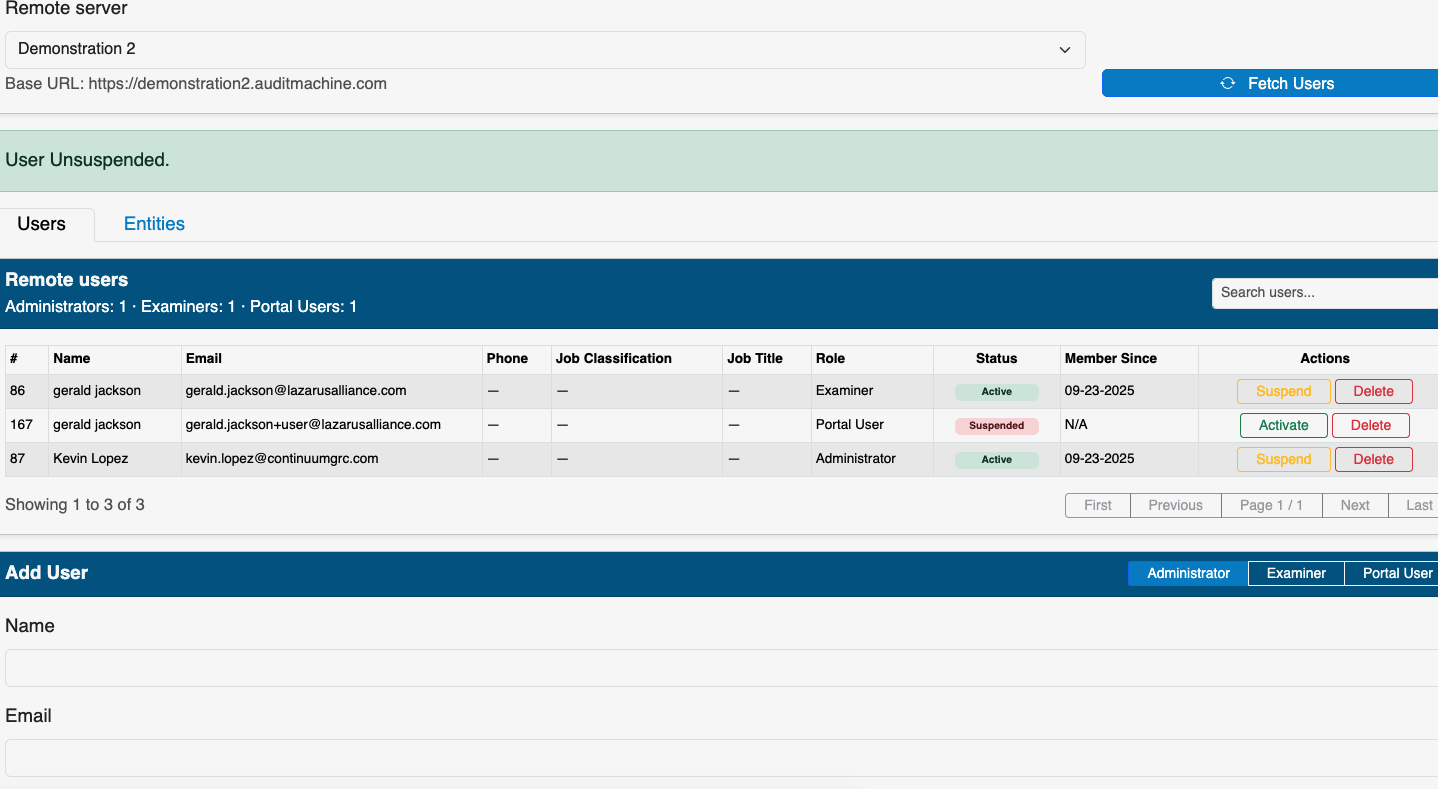
User Management
Unlike the User Management dashboard on your local ITAM instance, the Centralized User Management screen allows you to connect with remote servers you have access to and create users on those instances. This requires that your user account already has administrator privileges on that server through your local administrator account.
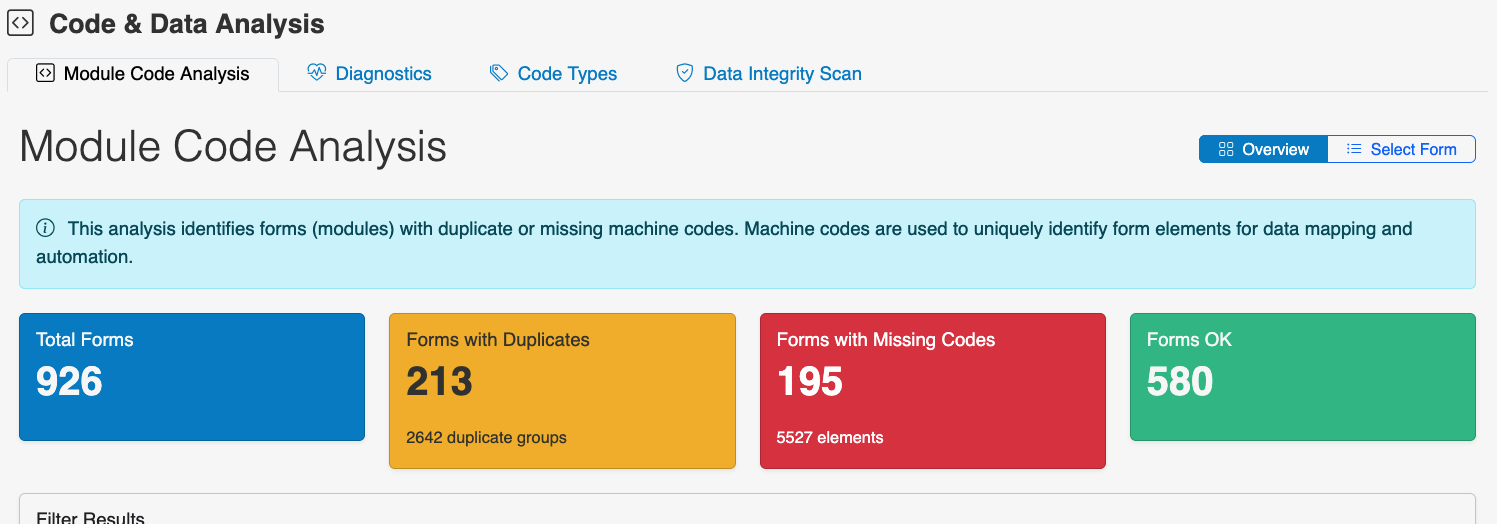
Code and Data Analysis
The Code and Data Analysis screen covers Form Elements and associated machine codes. These codes are used to map control elements across different forms to ensure consistency. Here, you can get a high-level overview of the codes in your instance, how many codes are duplicated across different elements, and which forms do or do not have the expected associated codes for the elements they contain.
Diagnostics
With the large number of form elements in place within any ITAM instance, it’s not uncommon that some of these elements get duplicated or orphaned during form management processes.
The diagnostics tool helps you, as the administrator, identify any issues with form elements. In the Code and Data Analysis dashboard, click the Diagnostics tab, then click the Start Tests button.
If there are any issues, the diagnostic tool will identify them and provide a summary, as shown on the screen here. To dig deeper into this issue, click the Analyze button.
Now, you can see some of the particulars of the issue. In this case, we can see that the problematic control is missing a control group. The diagnostic tool lets you either recreate the group for that element or delete the element altogether.
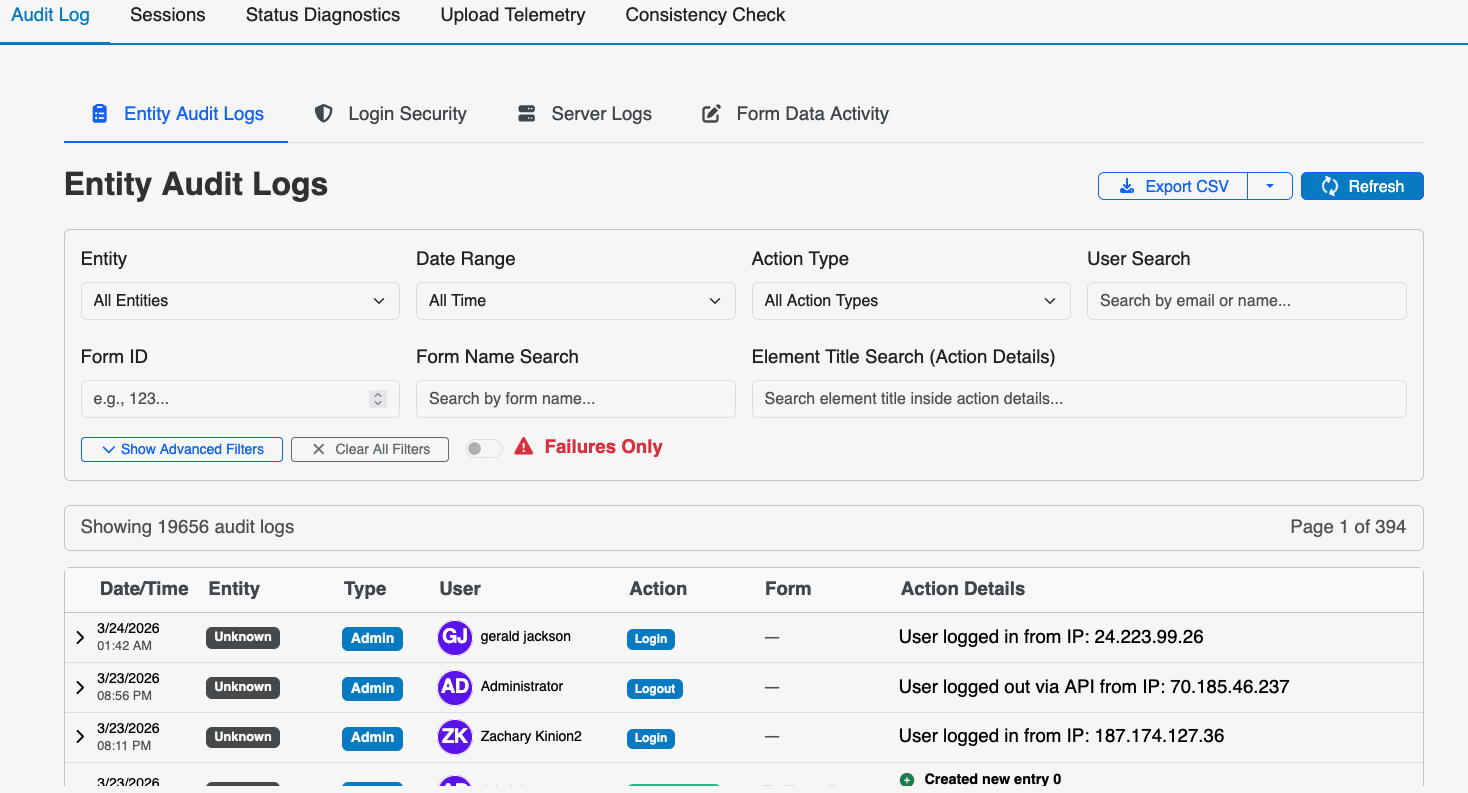
Audit and Analytics
To help you meet compliance requirements, ITAM provides several methods for collecting audit data from users and examiners. This can help admins better manage this data and download copies as needed for reporting.
The primary approach is to access the Audit and Analytics tab. Here, you’ll be able to pull audit logs based on several search criteria:
- By entity,
- By action type (see a list of covered actions in the Administrator’s Handbook),
- By the date of the action, and
- By user.
Regardless of your search criteria, the audit logs table will show you the same key information for each record, with each row representing an action in the ITAM system:
- The date and time the action took place,
- The entity within which the action was taken,
- The user who took the action, along with their account email,
- The type of action they took,
- The form they took the action in (if applicable),
- The IP the user connected from, and
- The type of user permissions associated with that action (administrator, examiner, or portal user).
To refresh the audit to capture real-time activity, click the Refresh button.
And, if you want a spreadsheet record of the logs you’ve pulled, click the Export CSV button.
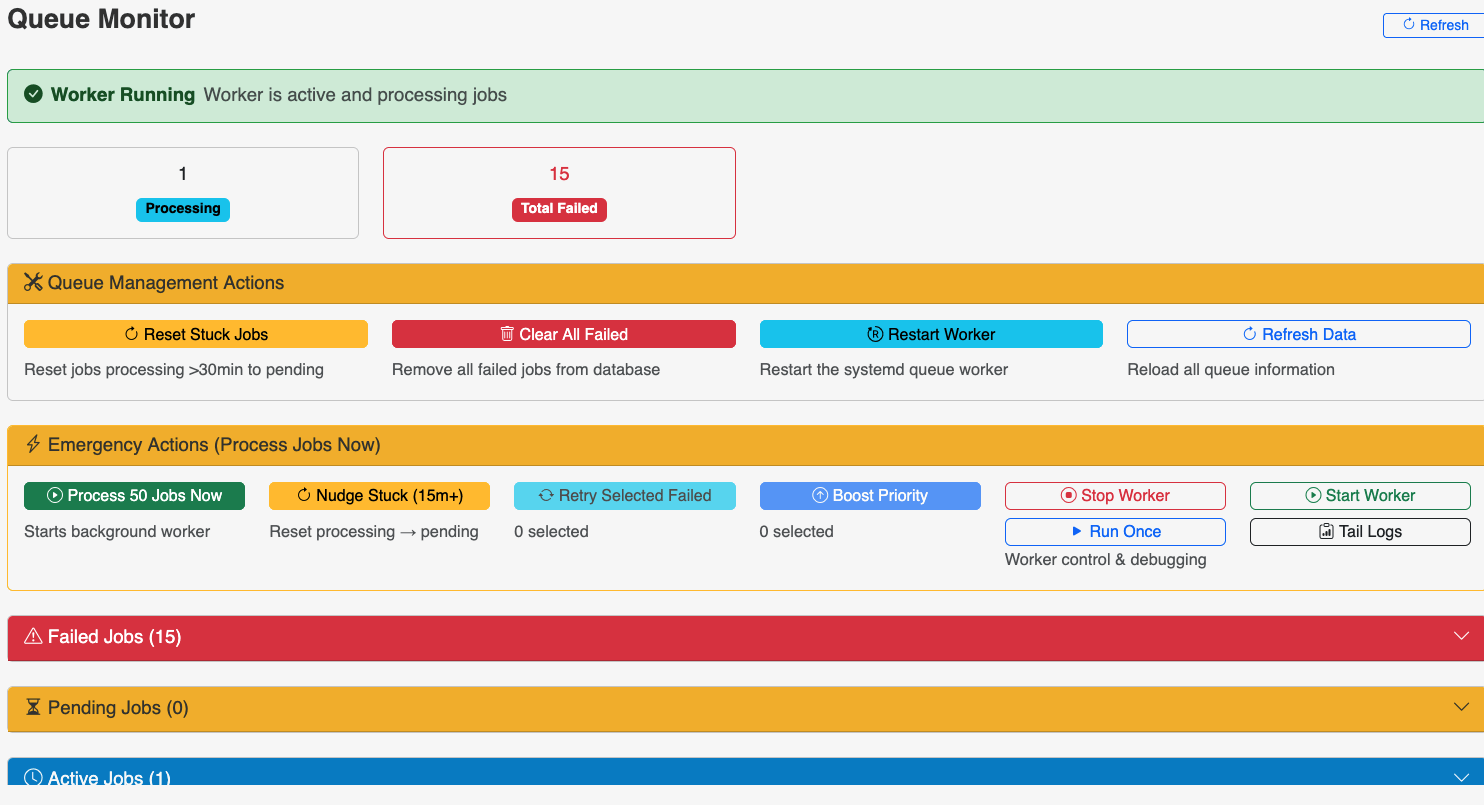
Queue Monitor
The Queue Monitor is a comprehensive dashboard covering all jobs and workflows in ITAM. This dashboard includes lists of currently running jobs, jobs that have failed or are scheduled, and jobs waiting to be processed.
Integrations
Outside of form-level integration settings, you’ll also have control over platform-level integrations.
These include:
Global Teamwork Integration Settings
- Teamwork User Mappings: Here, you can map an ITAM user directly onto a Teamwork user for purposes of automating data sharing and posting.
- Teamwork Form Integration Settings: This simply lets you select a form and map integrations, as you would on the Form Integration page.
- Global Teamwork Settings: In this section, provide your Teamwork URL and API key. You can set different Teamwork integration settings for each Portal Entity by selecting that entity from the Selection dropdown or the Configured Entities list.
Legacy Form-Level Integrations
This menu gives you access to the form integration options.
Google Drive Settings
This menu option lets you select a backup folder in a pre-configured Google Drive account. This does not give you access to set up that integration here; instead, it must be set up on the server side before making changes to this feature.
Global Dropbox Integration Settings
Nearly identical to the Teamwork section, the Dropbox integration pane will prompt you to select an entity, enable Dropbox integration for that entity, and provide an API key from your Dropbox account. You’ll also be able to generate shareable links and control how Dropbox forms reflect your ITAM backups.
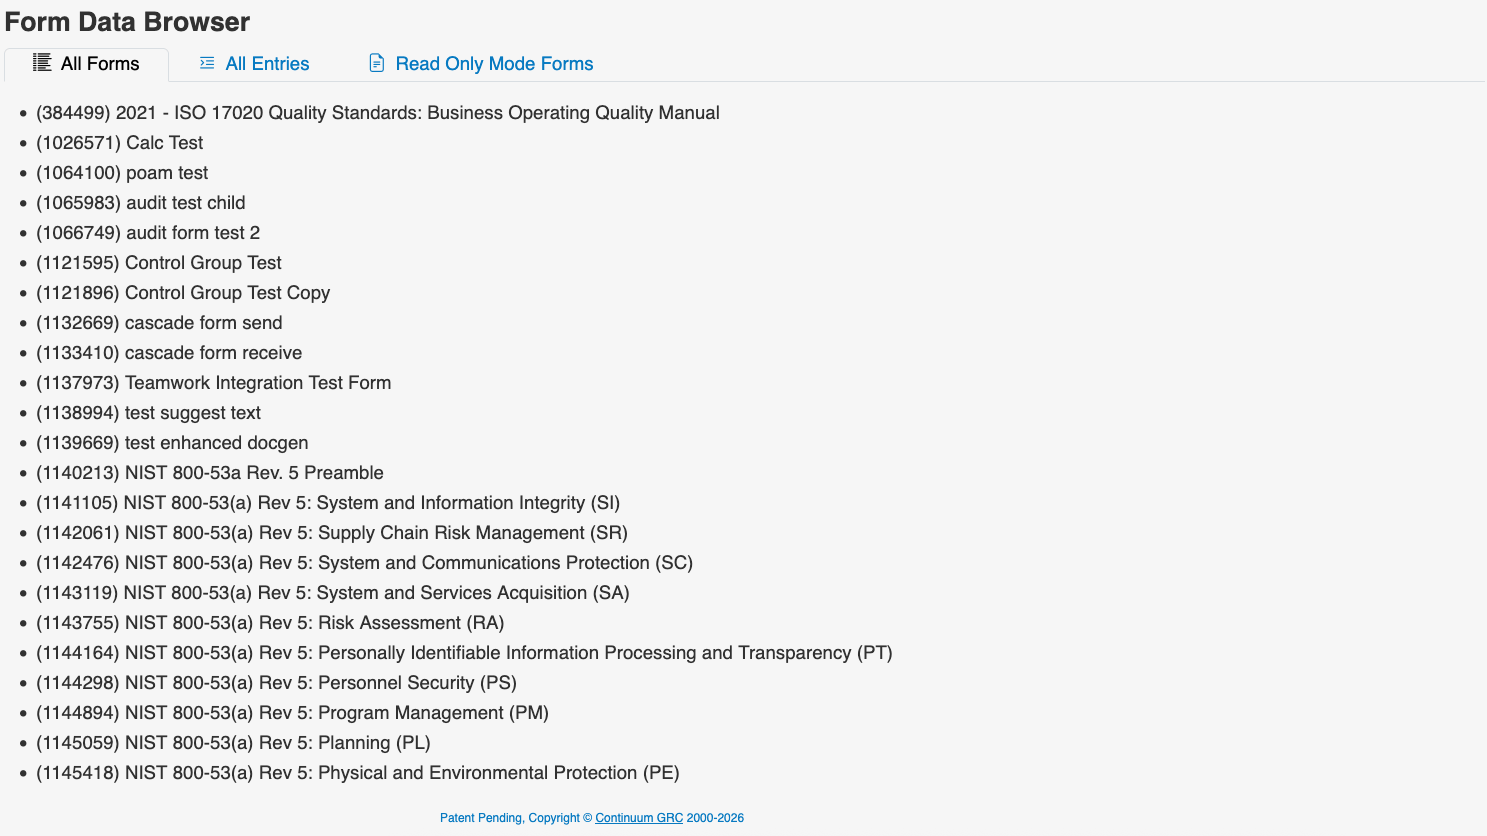
Form Data Browser
The Form Data Browser is a comprehensive list of forms and form-related information. This includes:
- All Forms
- All Form Entries
- All Forms Entries in Read-Only Mode (with the option to disable read-only mode)
File Management
Outside of direct file management in the Files section, you can perform some important maintenance and management tasks in the settings section.
In the Settings dashboard, click on the File Management tab. You’ll see several management options:
Check Missing Files
This section uses the company code and metadata to produce a list of files that appear in your database but aren’t stored on disk. You can derive detailed, web-displayed lists as well as downloadable formats like JSON or CSV.
Restore Missing Files
If you ran the Check Missing Files report, you can use a downloaded JSON file to attempt to restore the missing files. The system will use existing backups to attempt to recover the files.
Cleanup Orphaned Files
This is a mirror-image operation of the Check Missing Files report. Here, you can identify files that are stored on disk but no longer have a reference in your ITAM database. Running this operation will delete those files. To protect against catastrophic data loss, you can run a Dry Run that lists the files to delete for your review.
Backup Recent Files
This interface lets you create a backup of your files for an arbitrary period. You can also control the file and space constraint limit, and include a Dry Run or Diagnostics before backing up data.
This backup can serve as a recovery medium for the Restore Missing Files operation.
Backup Status Overview
This window is a quick view of backup status, including:
- How many files have been backed up,
- The total size of your backup image,
- Companies contained in the backups,
- The last date of backup, and
- The remaining space available for backups.
It also provides a notification of how many recently uploaded files have been backed up (as a percentage).
Available Reports
This is a list of the Missing Files reports you’ve created, including those available for backup.
Hash Updates
We’ve covered hashes briefly in the File Management Unit. Let’s dive a little deeper into the subject in the administrator settings.
Cryptographic hashes are often essential for maintaining data integrity and for evidentiary purposes, including chain-of-custody documentation. And, because evidentiary files will often change over the course of your compliance journey, it’s necessary to manage up-to-date hash metadata for these files.
Whenever it’s time to update hashes across an entity, just click on the File Hash Update tab under the Settings section. Select an entity from the drop-down list and click the Update Hashes button.
Note that while the on-screen processing visualization will happen rather quickly, it may take some time for hashes to propagate across the entity’s files.
You can verify hashes by navigating to that entity’s files and looking at the hash values in the File Hash column.
Data Management
Recycle Bin
A comprehensive list of forms that have been deleted, with the option to restore these forms or delete them permanently.
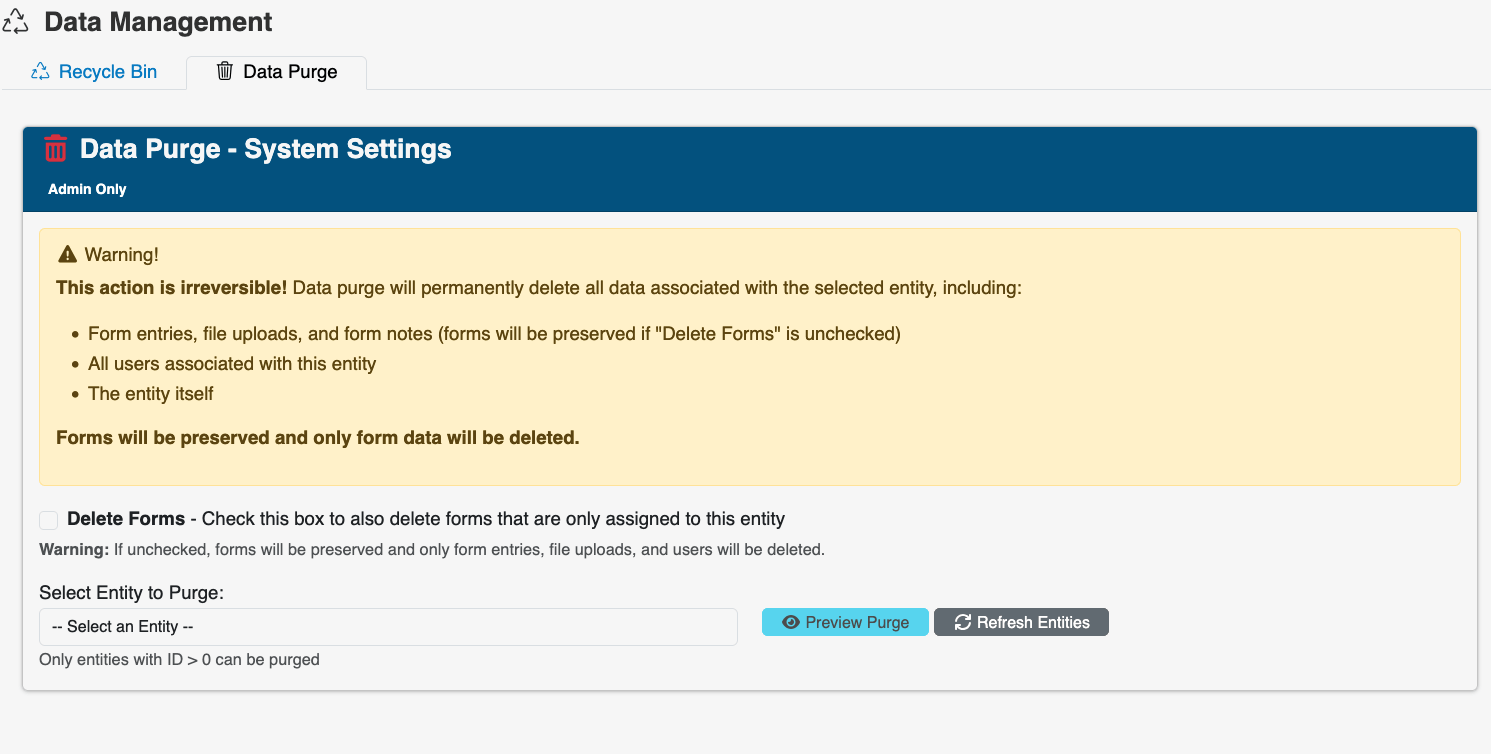
Data Purge
Warning: Data Purge is a nuclear option for administrators to clean up an entity’s data. This is a useful tool if you absolutely, 100% need to clear out an entity and start fresh and at ground zero.
The data purge tab is found on the Settings dashboard. When you click on the Data Purge tab, you’ll see a warning box outlining the consequences of this action:
- A data purge will only work for one entity.
- The purge will remove form entries, file uploads, and form notes.
- It will also remove all users associated with the entity, and
- It will delete the entity itself from ITAM records.
Any forms associated with the entity will be maintained unless you check the Delete Forms box. This will delete any form that is associated only with this specific entity.
To purge this data, select an entity from the Select Entity to Purge drop-down menu. If you need to update the list, click the Refresh Entities button.
Then, click the Preview Purge button. You’ll get a preview of the entity to purge, including the forms, form entries, file uploads, form notes, users, and relations that will be removed.
If you’re sure this is correct, click the Proceed with Purge button.
System Settings
Within the Settings Dashboard, there is another deep set of System Settings that lets administrators control the platform's core features. When you click on the System Settings tab, you’ll see this list… and it can look a little intimidating at first. But it’s best to just see this tab as a more comprehensive collection of settings that don’t fit under other tabs.
These settings are:
Use SMTP Server to Send Emails
When you check this box, you can specify an SMTP server for email in ITAM. This gives you more control over email security if needed.
System Theme
You can toggle between Light and Dark themes for ITAM (by default) or any themes added by developers.
SAML/OAuth2 for Single Sign-On
You can integrate SSO to require users to log in via a predefined sign-on provider.
Enable Slider Management
Here, you can tweak settings for the media slider at the bottom of the ITAM platform dashboards. This includes setting slider speed, text, RSS feeds, and videos to help users stay up to date and access how-to information. Slider elements are organized by card, each with text and media attachments. You can add additional elements by clicking the Plus sign in the lower corner of this field.
System Security Settings
Security Settings is a collection of security-focused features and options within the System Settings Dashboard that help you administer access to the platform.
- Disable Account Sharing will force an account to log off if it is used in another location or from another device.
- Disabling Email-Based OTP will remove the option for OTP verification via email and require users to access via SSO or an authentication OTP app.
- Enable IP Address Restriction and Blacklist allows you to create IP whitelists and blacklists (respectively).
- Enable Account Locking lets you lock account access for a specific period after a set number of invalid login attempts.
- Enable session time-out to set a timer for ITAM access, visible in your browser's title bar. This can be an arbitrary amount of time, and will use the user’s activity (clicks, etc.) to reset the timer.
- Enable site down will halt login attempts by removing the login page.
- Allow self-registration at the user portal gives your users the ability to register. Unchecked, and you will have to register them.
- Enable password expiration lets you set an arbitrary window for passwords, after which the user must set a new one as a way to rotate old passwords.
- Enforce the 50% rule on passwords, which disallows users from setting their own passwords and provides them with one during registration.
- Enable Automatic Account Suspension and Deletion for Inactivity will suspend or delete any account (including admins) for inactivity over an arbitrary period.
- Invite and Password Reset Link Expirations allow you to set an arbitrary time limit for user invite and password reset links. After this period, the user will need a new invitation to sign up for ITAM.
- The reCAPTCHA key lets you embed reCAPTCHA on your site's login portals.
Miscellaneous
Within the Systems Settings Dashboard, there is another subsection of settings helpfully dubbed Miscellaneous. This is a collection of platform settings that cover several facets of how the platform looks and behaves.
- The Admin and User Help URLs lead each user type to their respective handbook support pages. These URLs dictate where clicking on the Help question mark takes you.
- The Admin Panel Header Image URL is for your company’s logo. Adding an image link here displays the image in the upper-left corner of your Admin panel.
- The Login Footer Image URL loads the specified image in the footer of your ITAM login page, which users see upon logging in.
- User Portal Homepage Video URL embeds a video on your users’ main page. This is a good place to put a walkthrough or onboarding video that introduces users to their tasks.
- The Disclaimer Message, where any message here will display to a user attempting to download sensitive information to their machine.
- Enable Account Management Notification to display a separate welcome page upon successful login. If enabled (by clicking the checkbox), you’ll be able to specify an image URL and welcome message to display on this page.
- Allow Download/Open in New Window for File Viewer enables these respective buttons on the file viewer. When a user clicks a file link in a form or the File Management Dashboard, the button offers the option to download or open the file in a new tab.
- Enable A.ITAM, AI, and AI for A dot ITAM enable AI functionality for A dot ITAM features and non-A dot ITAM features, including language and voice support.
Finally, the final list of assorted settings includes:
- Setting the default “From” name and address for email notifications,
- The URL for the ITAM Admin panel. Note that you will most likely not need to change this, and should not do so without good reason and consultation with Continuum GRC.
- The default folder for file uploads,
- The default platform theme and font family,
- The maximum list of entries in the user’s Form Manager,
- The minimum password length.
- Finally, you can check the 'Remove the "Powered by IT Audit Machine" link from all my forms' option to remove this textual watermark from forms.
Form Import/Export
As the name implies, you can either export or import a form. ITAM forms are sets of JSON files in a .zip archive, and you can only import forms exported from ITAM.
Folder Import/Export
This is identical to the Form version, but produces and accepts .zip archives containing data for entire form folders.
Export ALL Forms
If needed, you can export an archive of all forms from your ITAM instance. You can also import this archive into other ITAM systems.
Sitewide Theme (Whitelabeling)
Many of our partners and clients use ITAM services as a white-label solution for their brand and customer base. In this section, you can change the color scheme for the primary ITAM UX sections (background color, primary colors, secondary colors, error colors, and success colors) and upload a custom logo for your ITAM instance.
OSCAL Package Import
If you have your reports and forms packaged as an OSCAL document, you can use the OSCAL Package Import Utility to import that information directly into ITAM. Simply give the form a name, upload your OSCAL ZIP file (ensuring it meets the requirements listed in the settings), and click the Create form from OSCAL button.
Ready to build your Roadmap to Risk Reduction?
Call 1-888-896-6207
Call 1-888-896-6207
Start Your Free 14-Day Trial