The Settings Dashboard is the central hub for controlling your ITAM instance. Here, you can manage how the platform looks and feels, manage users, control data, and perform important management tasks related to forms, users, and reports. It also provides information on the system’s state, including active users and existing forms.
On both the main dashboard page and the side menu, you’ll find a list of setting categories that provide administrators with complete control over their systems:
- Global Logic
- Module Sequencing
- Code and Data Analysis
- Audit and Analytics
- RSS Keyword Alerts
- Time Rules
- Orphan Entry Repair
- System Settings
Module Sequencing
An important part of managing forms and modules across client entities is ensuring that form fields and control groups remain consistent across organizations and that any changes receive appropriate oversight and approval. The Sequencing module allows administrators to control this in a single dashboard:
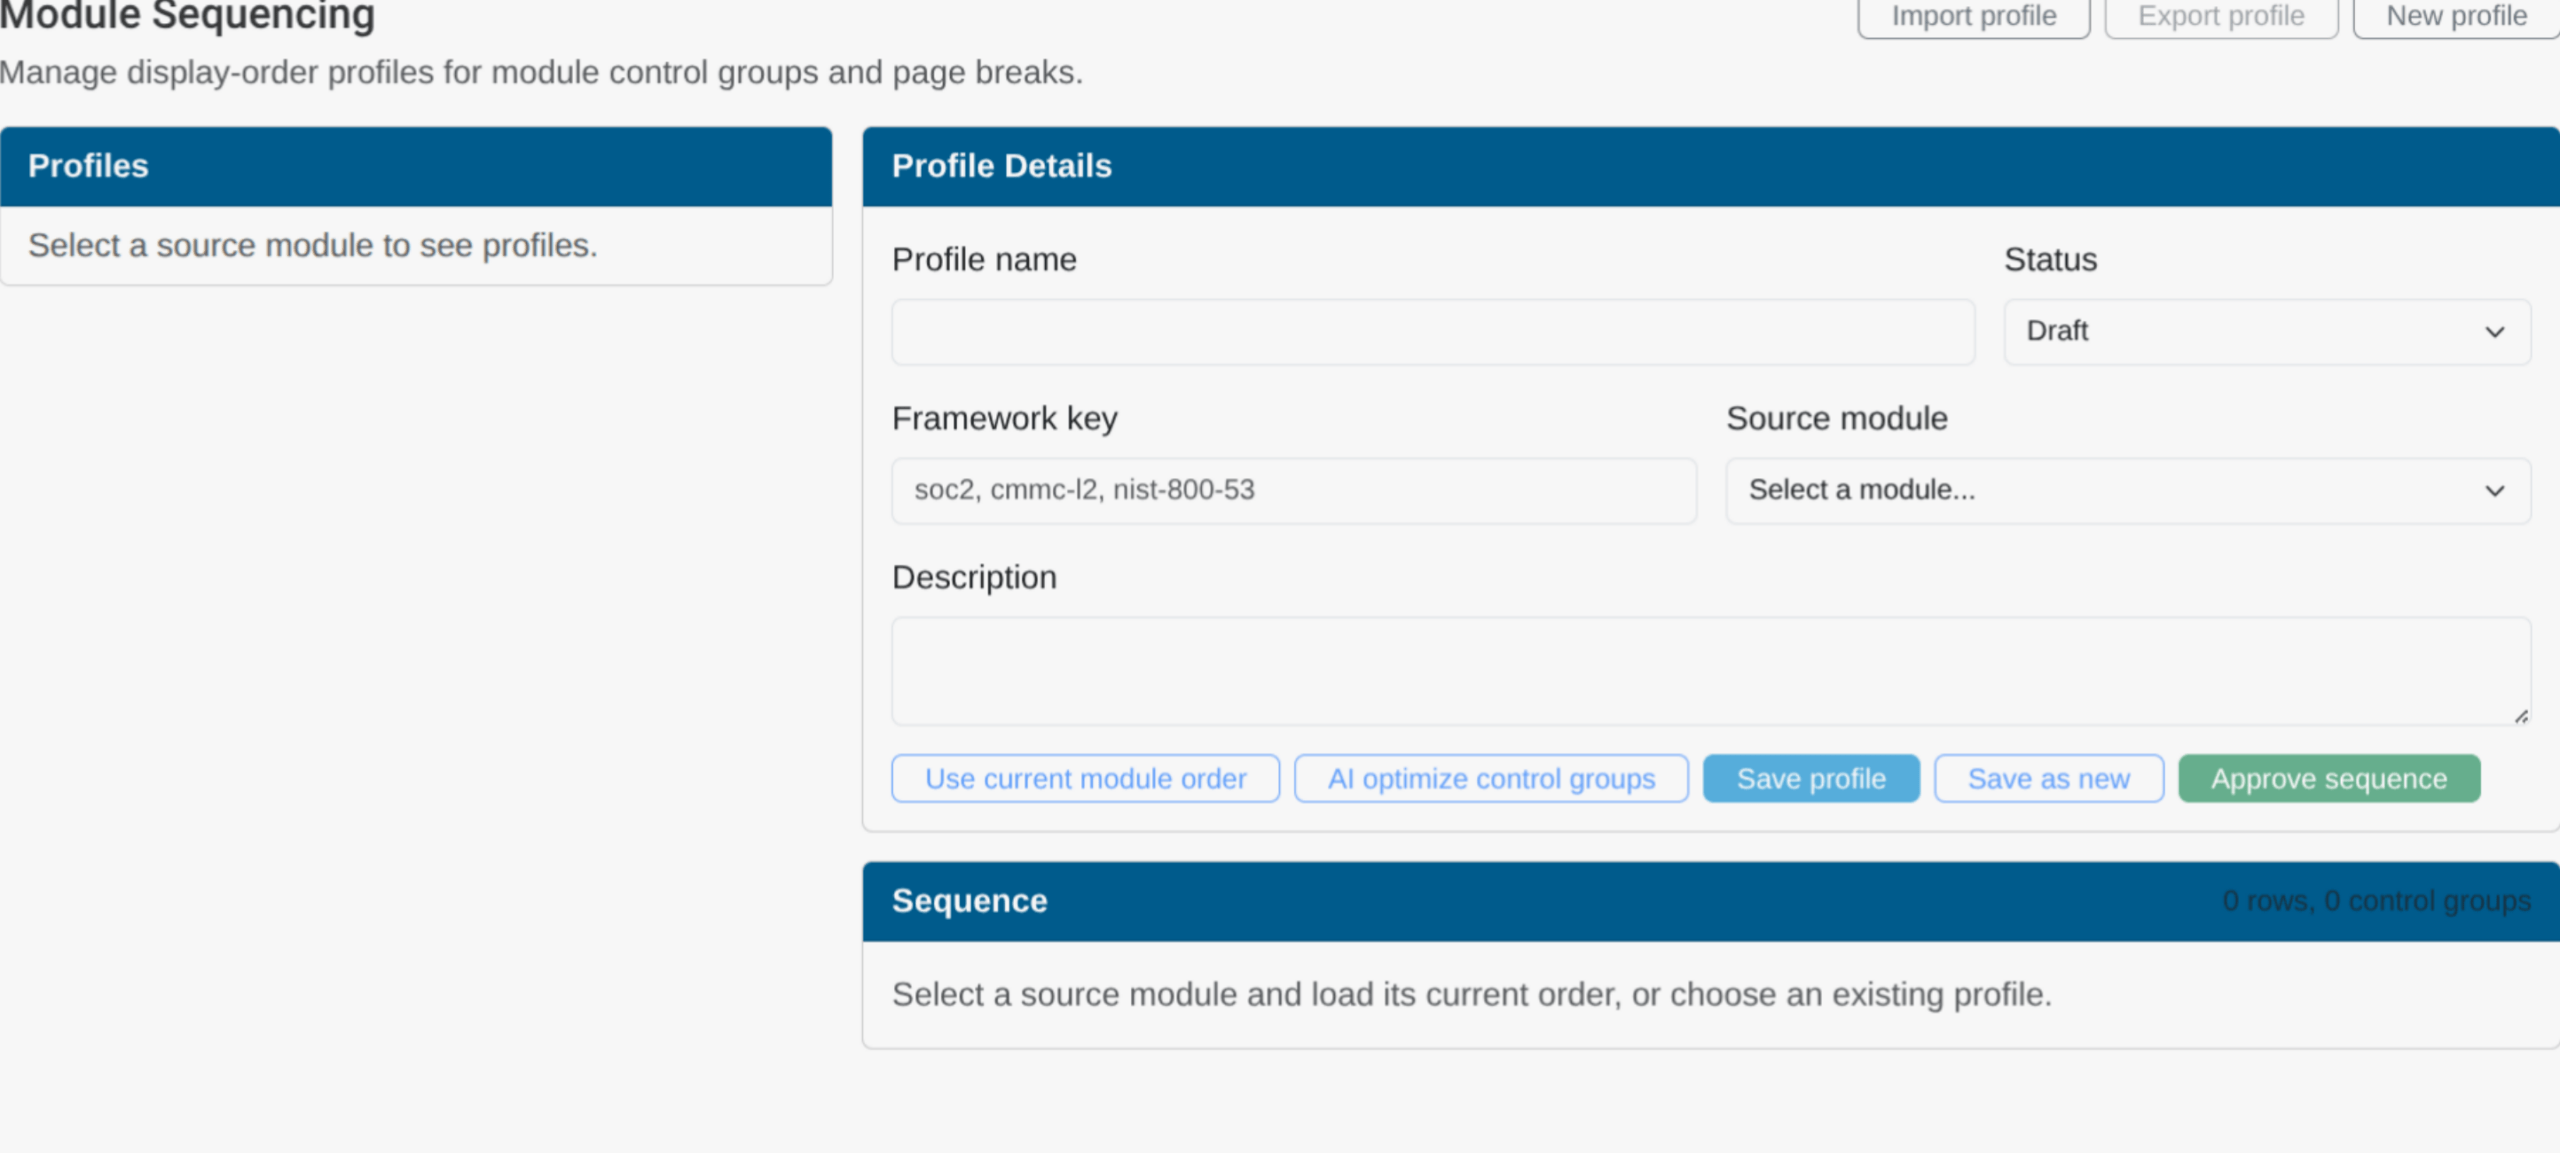
In the settings screen, click on the Module Sequencing tab. On the Module Sequencing page, you’ll see an interface that allows you to build and approve different form structures based on new or existing forms.
First, at the top of the screen, you’ll see three buttons: Import Profile, Export Profile, and New Profile. Profiles are JSON files that you can export and import across different ITAM instances.
When you click the New Profile button, however, you’re given a blank form template. To create a new module sequence profile, simply give the profile a new name, set the status to draft, define the framework you’re using, and select a source module. You can also provide a description of the profile.
Once you select the source module, A list of the individual modules will appear in the sequence section. You can manually move specific modules up or down with the Up/Down buttons, or by clicking and dragging them using the same-named button.
Additionally, you’ll have several options to finalize the form sequence:
- Use Current Module Order will do just this, locking in the module sequence until further edited.
- AI Optimize Control Groups will use proprietary A dot ITAM capabilities to suggest a module order based on existing form structure data in the instance.
- Save Profile saves the profile for future editing
- Save as new creates a copy of the current profile with the same structure
- Approve sequence saves for profile and sets its status to Approved
You can also manually set the profile status to Draft, Approved, or Archived at any time.
Code and Data Analysis
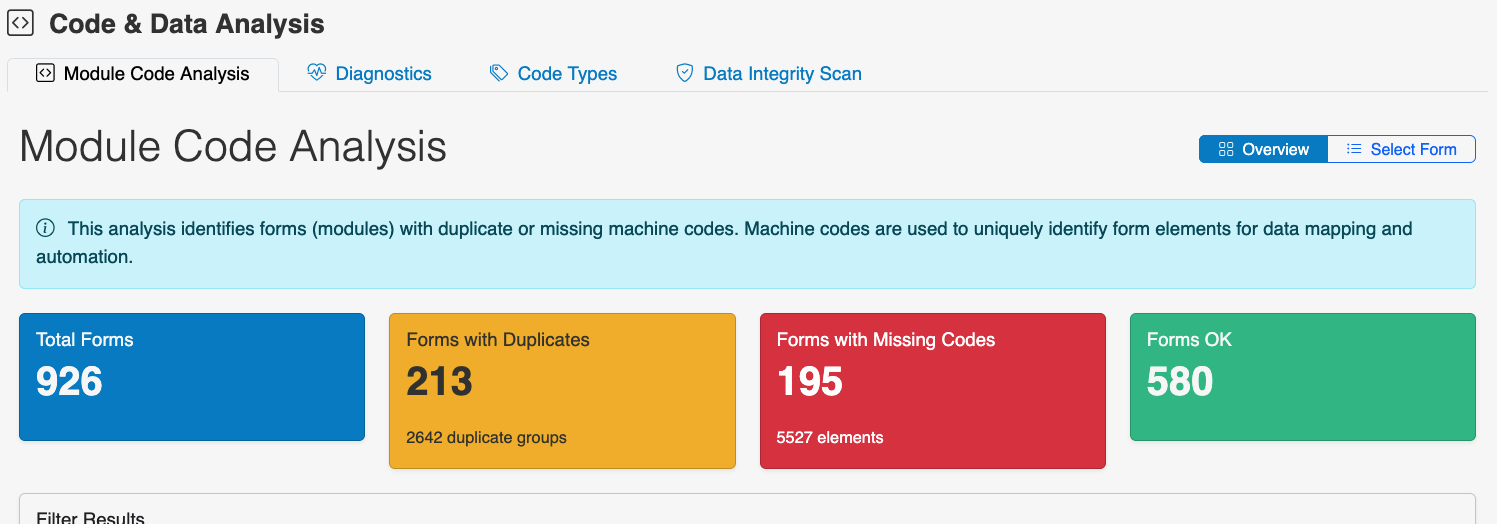
The Code and Data Analysis screen covers Form Elements and associated machine codes. These codes map control elements across different forms to ensure consistency. Here, you can get a high-level overview of the codes in your instance, how many codes are duplicated across different elements, and which forms do or do not have the expected associated codes for the elements they contain.
Audit and Analytics
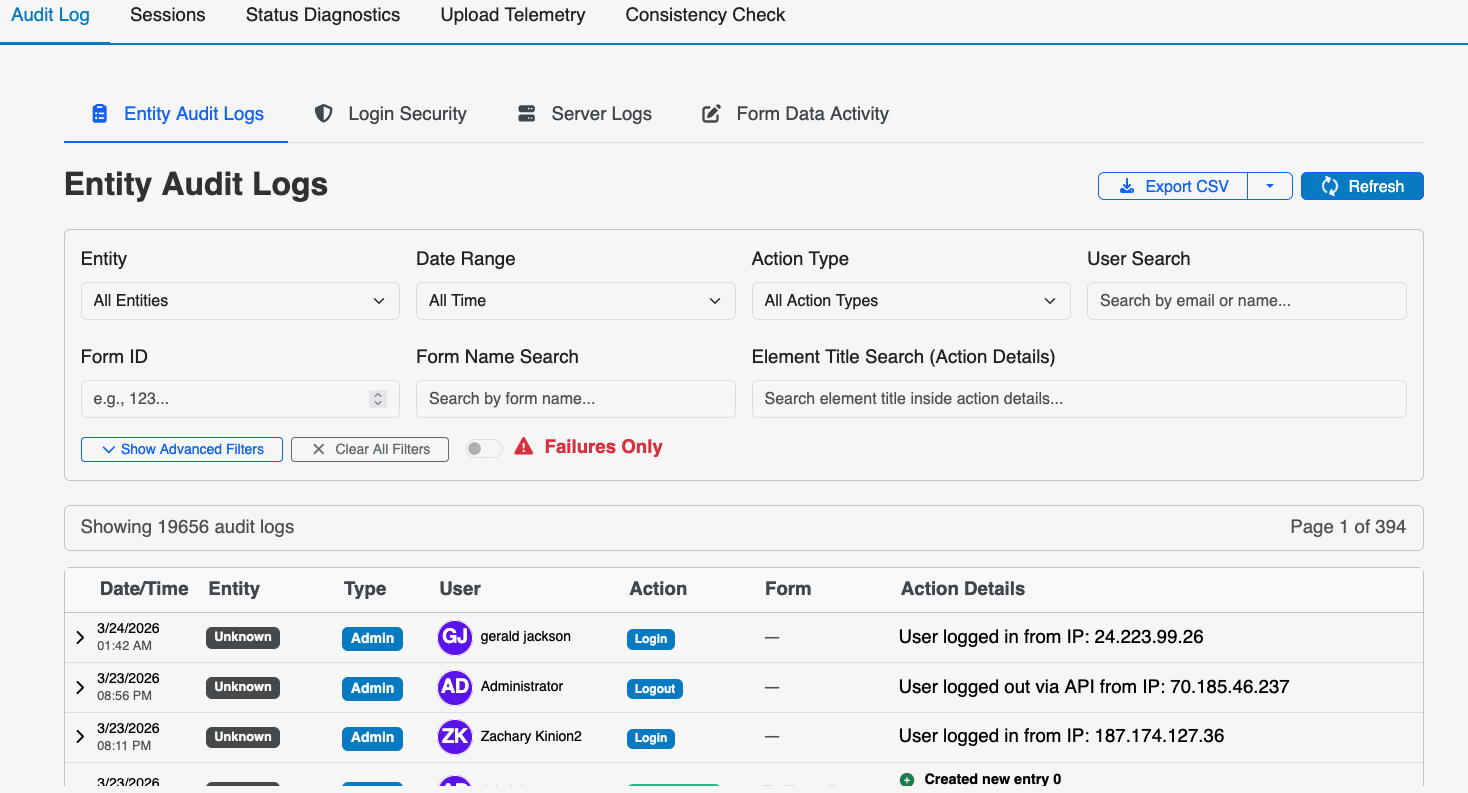
ITAM provides several ways to collect audit data from users and examiners so you can manage that data and download copies for reporting.
The primary approach is the Audit and Analytics tab, where you pull audit logs by:
- Entity
- Action type
- Date of the action
- User
Whatever your search criteria, the audit logs table shows the same key information for each record, with each row representing an action in the ITAM system:
- The date and time the action took place
- The entity the action was taken within
- The user who took the action, along with their account email
- The type of action taken
- The form the action was taken in, if applicable
- The IP address the user connected from
- The permission type associated with that action — administrator, examiner, or portal user
Click Refresh to capture real-time activity. Click Export CSV for a spreadsheet record of the logs you have pulled.
System-Wide Settings
Within the Settings Dashboard, there is another deep set of System Settings that lets administrators control the platform’s core features. When you click on the System Settings tab, you’ll see this list… and it can look a little intimidating at first. But it’s best to just see this tab as a more comprehensive collection of settings that don’t fit under other tabs.
| Use SMTP Server to Send Emails | Specify an SMTP server for email in ITAM. This gives you more control over email security if needed. |
| System Theme | Toggle between Light and Dark themes for ITAM (by default) or any themes added by developers. |
| SAML/OAuth2 for Single Sign-On: | You can integrate SSO to require users to log in via a predefined sign-on provider. |
| Enable Slider Management | Tweak settings for the media slider at the bottom of the ITAM platform dashboards. This includes setting slider speed, text, RSS feeds, and videos to help users stay up to date and access how-to information. Slider elements are organized by card, each with text and media attachments. You can add additional elements by clicking the Plus sign in the lower corner of this field. |
Miscellaneous
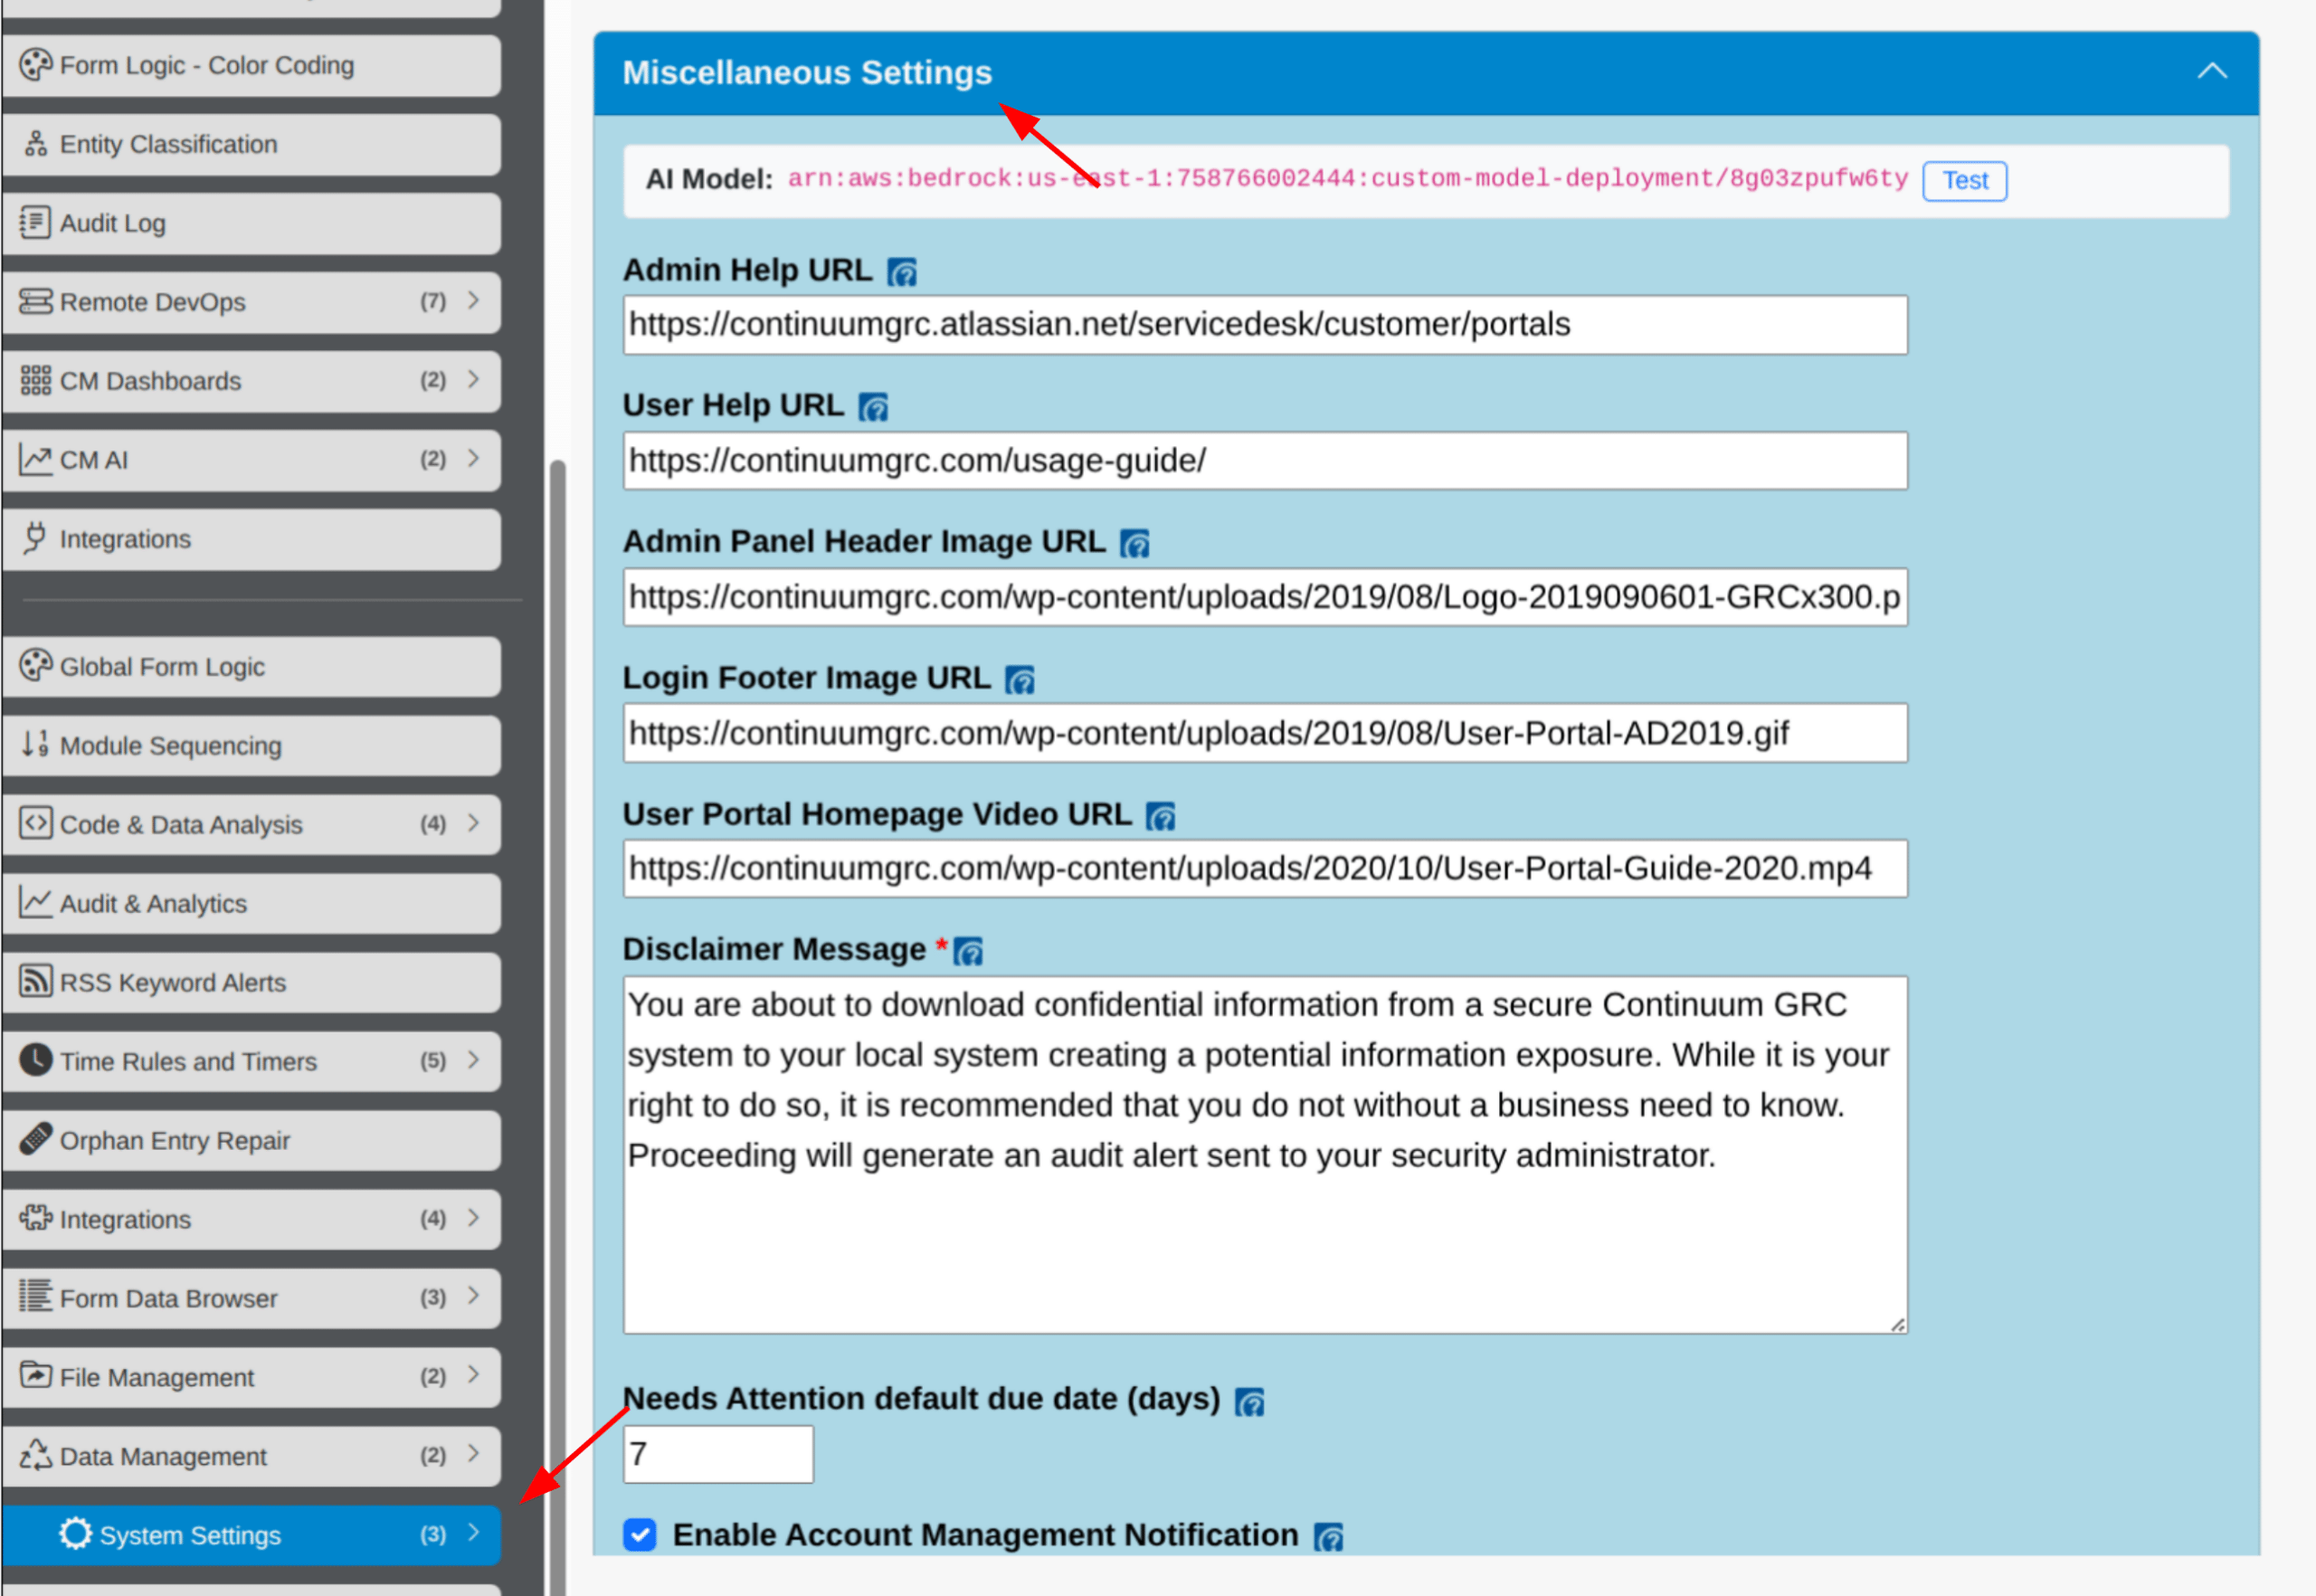
Within the Systems Settings Dashboard, there is another subsection of settings helpfully dubbed Miscellaneous. This is a collection of platform settings that cover several facets of how the platform looks and behaves.
| Admin and User Help URLs | Lead each user type to their respective handbook support pages. These URLs dictate where clicking on the Help question mark takes you. |
| Admin Panel Header Image URL | Adding an image link here displays the image in the upper-left corner of your Admin panel. This is for your company’s logo. |
| Login Footer Image URL | Load the specified image in the footer of your ITAM login page, which users see upon logging in. |
| User Portal Homepage Video URL | Embed a video on your users’ main page. This is a good place to put a walkthrough or onboarding video that introduces users to their tasks. |
| The Disclaimer Message | Display a separate welcome page upon successful login. If enabled (by clicking the checkbox), you’ll be able to specify an image URL and welcome message to display on this page. |
| Enable Account Management Notification | Any message here will display to a user attempting to download sensitive information to their machine. |
| Allow Download/Open in New Window for File Viewer | Enable these respective buttons on the file viewer. When a user clicks a file link in a form or the File Management Dashboard, the button offers the option to download or open the file in a new tab. |
| Enable A.ITAM, AI, and AI for A.ITAM | Enable AI functionality for A.ITAM features and non-A.ITAM features, including language and voice support. |
Finally, the final list of assorted settings includes:
- Setting the default “From” name and address for email notifications,
- The URL for the ITAM Admin panel. Note that you will most likely not need to change this, and should not do so without good reason and consultation with Continuum GRC.
- The default folder for file uploads,
- The default platform theme and font family,
- The maximum list of entries in the user’s Form Manager,
- The minimum password length.
- Finally, you can check the ‘Remove the “Powered by IT Audit Machine” link from all my forms’ option to remove this textual watermark from forms.
Import/Export Settings
| Form Import/Export | As the name implies, you can either export or import a form. ITAM forms are sets of JSON files in a .zip archive, and you can only import forms exported from ITAM. |
| Folder Import/Export | This is identical to the Form version, but produces and accepts .zip archives containing data for entire form folders. |
| Export ALL Forms | If needed, you can export an archive of all forms from your ITAM instance. You can also import this archive into other ITAM systems. |
| Sitewide Theme (Whitelabeling) | Many of our partners and clients use ITAM services as a white-label solution for their brand and customer base. In this section, you can change the color scheme for the primary ITAM UX sections (background color, primary colors, secondary colors, error colors, and success colors) and upload a custom logo for your ITAM instance. |
| OSCAL Package Import | If you have your reports and forms packaged as an OSCAL document, you can use the OSCAL Package Import Utility to import that information directly into ITAM. Simply give the form a name, upload your OSCAL ZIP file (ensuring it meets the requirements listed in the settings), and click the Create form from OSCAL button. |
System Security Settings
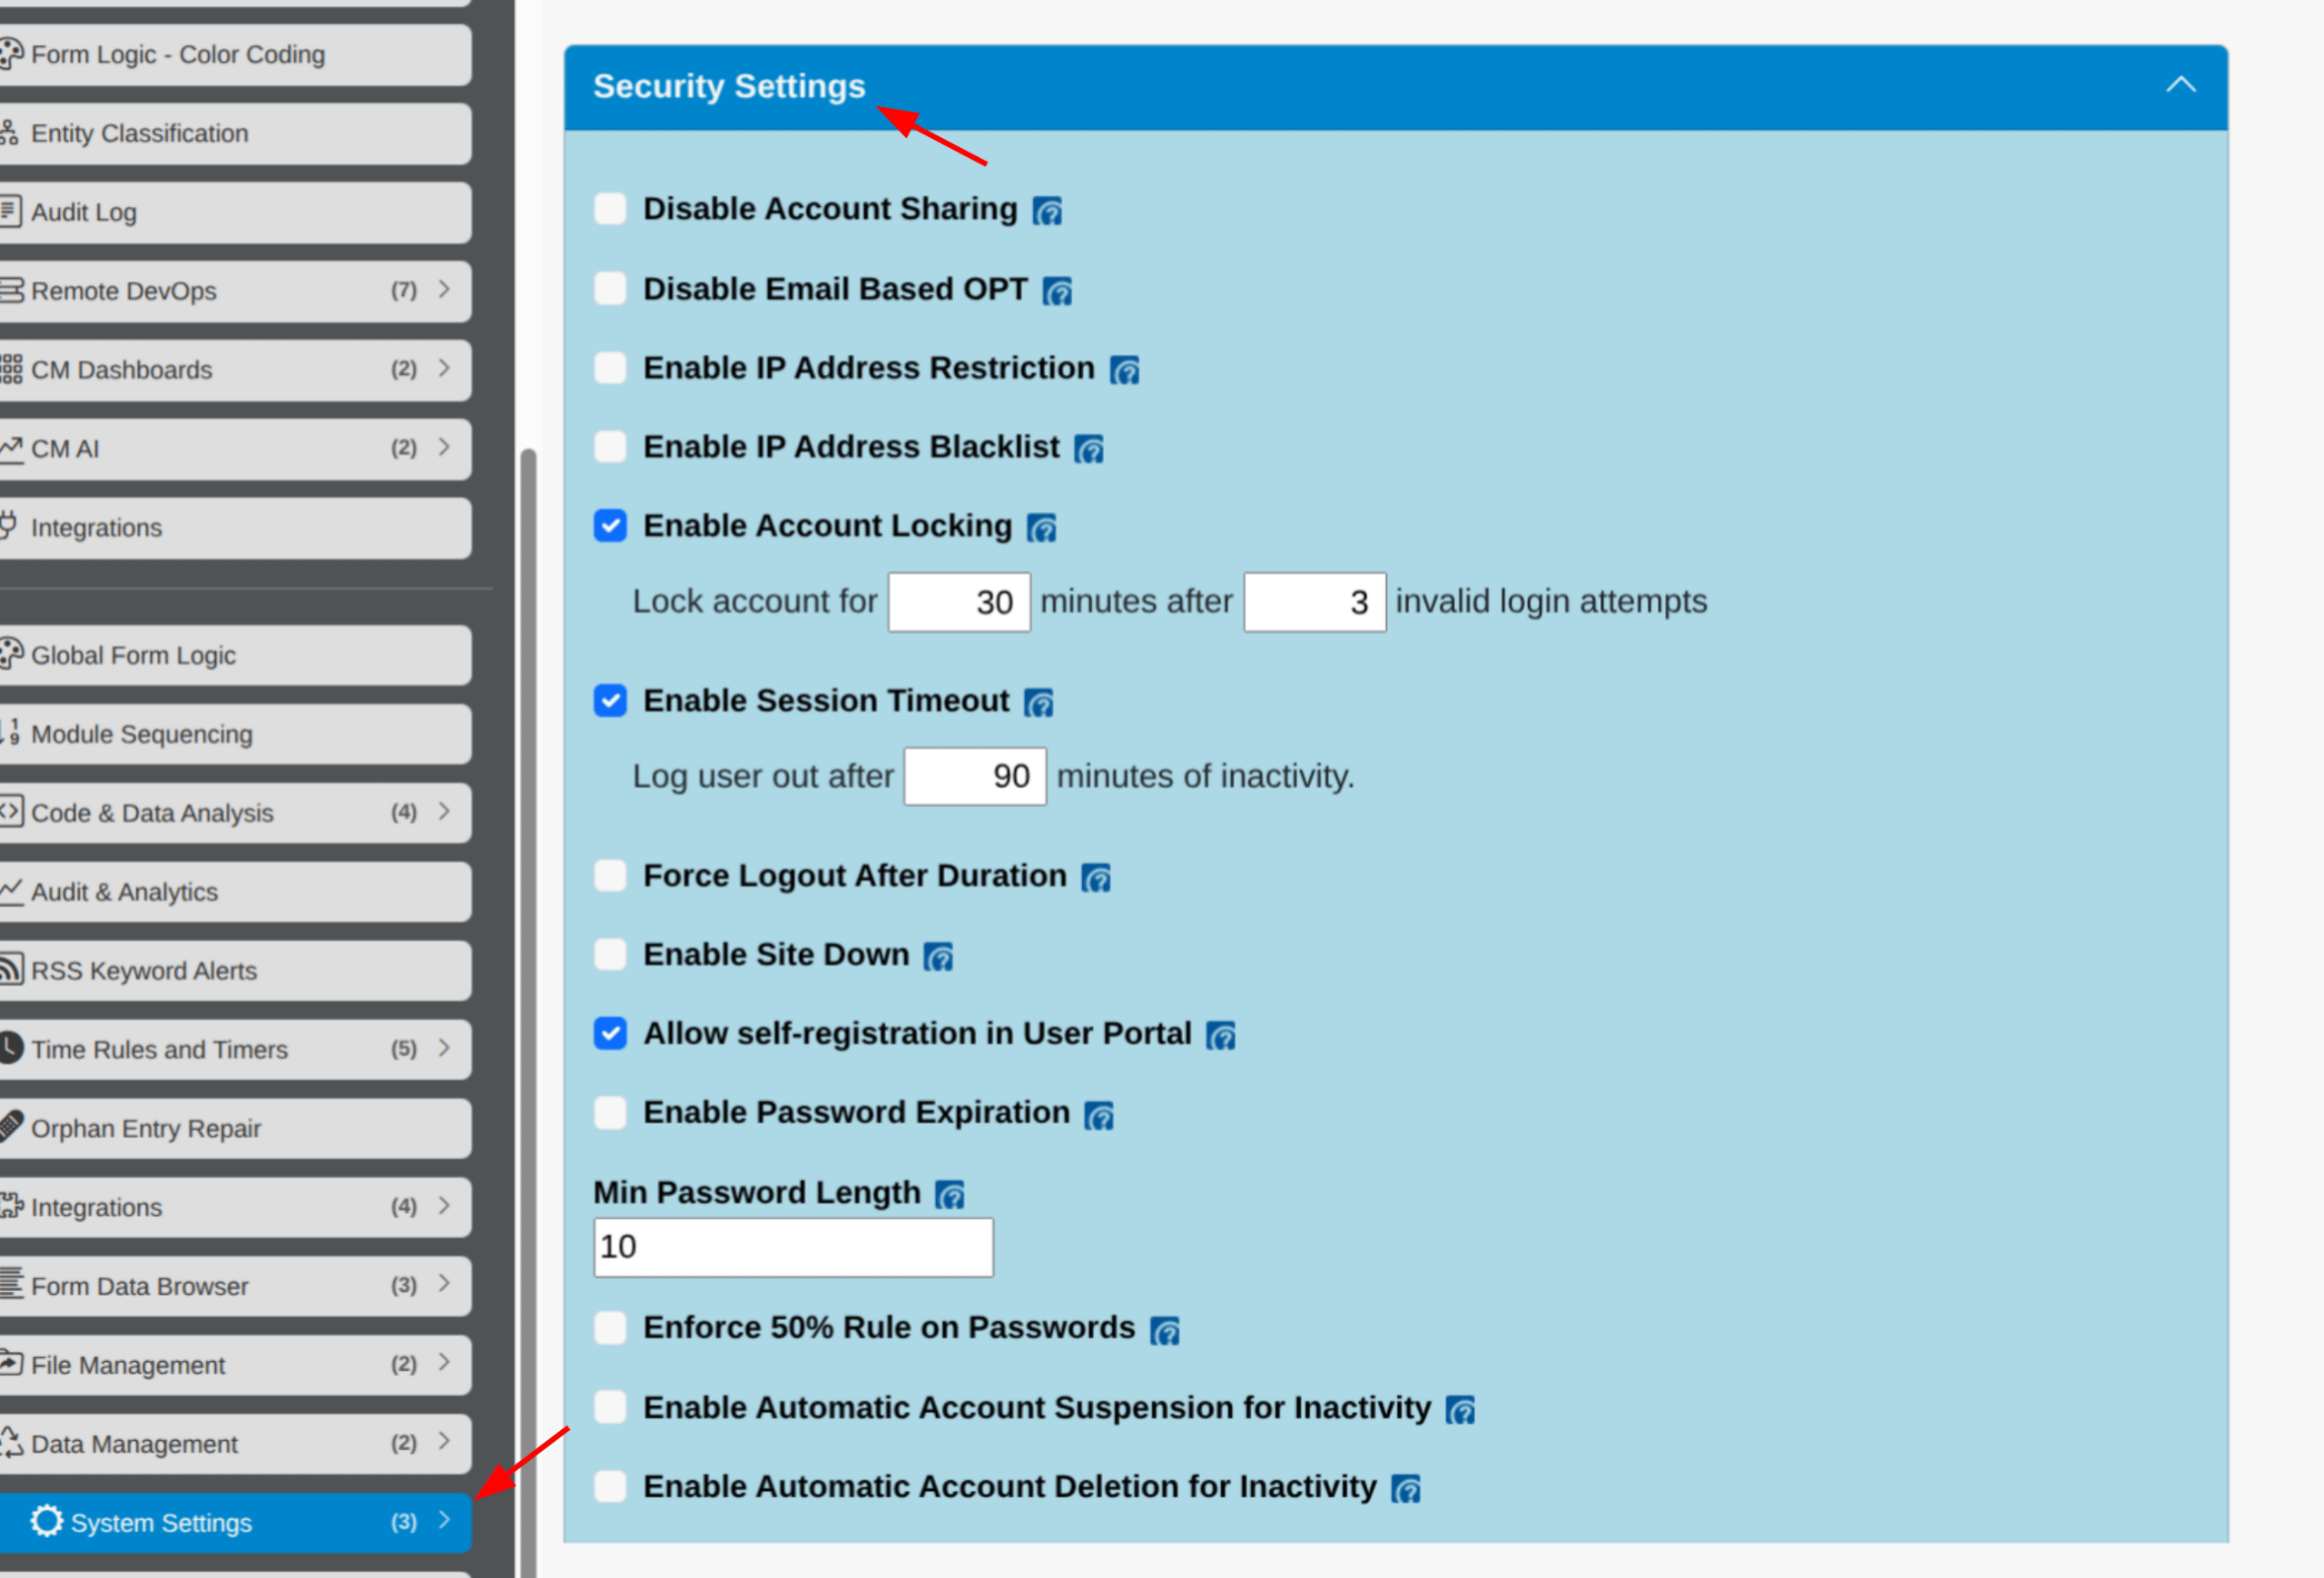
Security Settings is a collection of security-focused features and options within the System Settings Dashboard that help you administer access to the platform.
| Disabling Email-Based OTP | Remove the option for OTP verification via email and require users to access via SSO or an authentication OTP app. |
| Enable IP Address Restriction and Blacklist | Allow you to create IP whitelists and blacklists (respectively). |
| Enable Account Locking | Lock account access for a specific period after a set number of invalid login attempts. |
| Enable session time-out to set a timer for ITAM access, visible in your browser’s title bar | This can be an arbitrary amount of time, and will use the user’s activity (clicks, etc.) to reset the timer. |
| Enable site down | Halt login attempts by removing the login page. |
| Allow self-registration | Lets your users register. If unchecked, you will have to register them. |
| Enable password expiration | Lets you set an arbitrary window for passwords, after which the user must set a new one to rotate old passwords. |
| Enforce the 50% rule on passwords | Disallows users from setting their own passwords and provides them with one during registration. |
| Enable Automatic Account Suspension and Deletion | Will suspend or delete any account (including admins) for inactivity over an arbitrary period. |
| Invite and Password Reset Link Expirations | Allows you to set an arbitrary time limit for user invite and password reset links. After this period, the user will need a new invitation to sign up for ITAM. |
| The reCAPTCHA key | Lets you embed reCAPTCHA on your site’s login portals. |
Ready to build your Roadmap to Risk Reduction?
Call 1-888-896-6207
Call 1-888-896-6207
Start Your Free 14-Day Trial
FedRAMP Certified GRC Platform Featuring the World's First AI Auditor