Form Notifications
One of the challenges in documenting compliance with a standard is keeping the process moving forward and everyone updated on the effort’s progress. ITAM was designed with a powerful notification engine to handle that very need. Each form created in ITAM allows form-specific email notifications and confirmations to be sent at various times during the process. You can use the default email format or customize several email notification parameters to adapt it to your organization’s needs.
Note: For most notifications, if you don’t need to craft a custom message, you can just enter the email address to which you want the notification sent, and ITAM will send it using our default format.
On this guide page, we’ll cover Form Notifications, an aspect of Advanced Form Management vital for effective communication while filling out a form. ITAM supports four (4) different types of notifications:
- Notification of form submission (Send Notification Emails to My Inbox)
- Confirmation to user after form submission (Send Confirmation Email to User)
- Send submission data to an alternate site (Send Form Data to Another Website)
- Send user reminders and notifications (Send Administrative Notices and Reminder Notices to User)
Accessing Email Notifications
The notifications button/tab below a form Manager form allows users to access a form’s email notification settings.
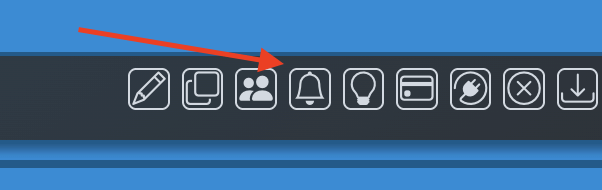
Regardless of the form you are working on, the Notification options are the same and only applicable to that form, giving you a powerful way to control how information notifications flow.
Notification Settings Interface
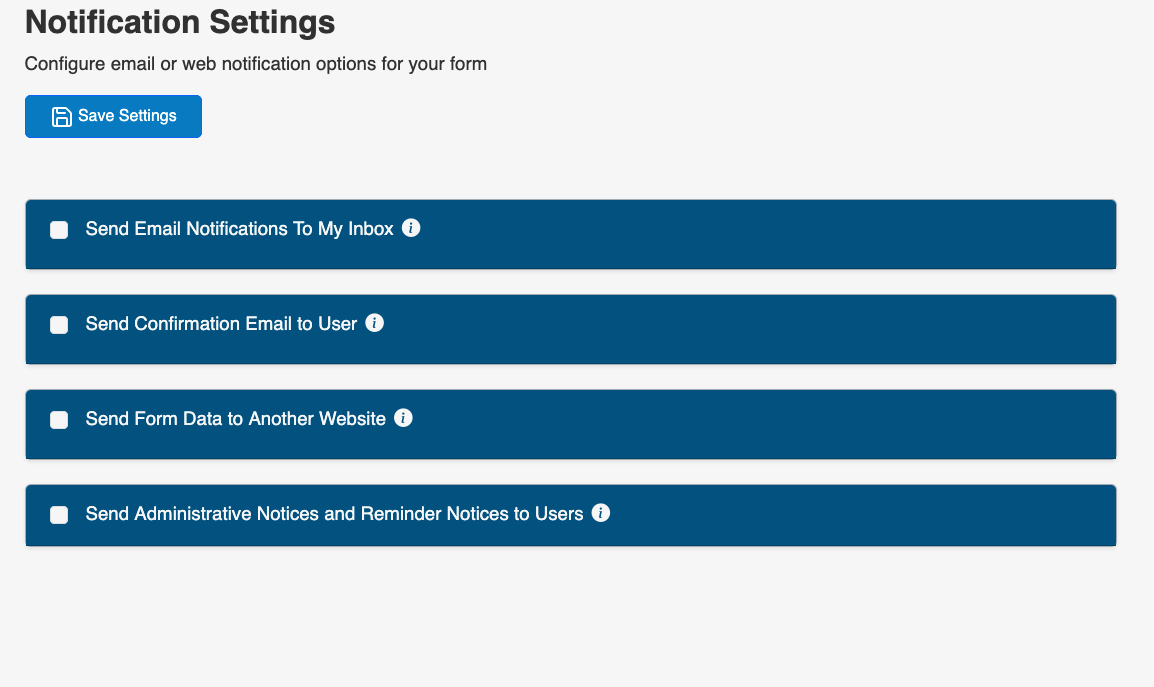
The notification settings interface contains the four (4) notification options. The first option is available to define an email notification to one or more interested parties, typically the form’s designer or administrator, that a submission has occurred. The second option allows you to define an auto-responder email notification to the user who completes and successfully submits the form. The third option allows you to send the form data to any other custom URL. The fourth option sends administrative notices to users based on a schedule.
Note: Select the checkbox next to the notification option title to enable all options.
Selecting any notification option expands that section to display some default configuration options. In some cases, a “more options” link is provided at the bottom of the form, which, when clicked, reveals additional customization options.
Customizing the Basic Email Options
Most of the email configuration fields should be familiar to email users. Clicking or hovering over the green question mark icon adjacent to each option displays additional help. However, several specific features are described in more detail below.
Note: A useful feature of the “Your Email Address” field is that it can handle multiple email addresses. Separate each email address by a semicolon, and ITAM will send a copy of the email notification to each recipient.
Customizing the Subject and Content
The Email Subject and Email Content fields in the email notification options are fully customizable using text, HTML, and CSS. You can also add template variables. These are accessed using the template variables link at the bottom of the fields. Template variables include form data in the notification and appear as a field name surrounded by curly braces (i.e., {field_name}). Don’t worry, you don’t have to know the template variable field names for each field yourself; the template variable link will pop up a Template Variable Lookup tool that can be used to add the fields you need to your notification.
Send Notification Emails to My Inbox
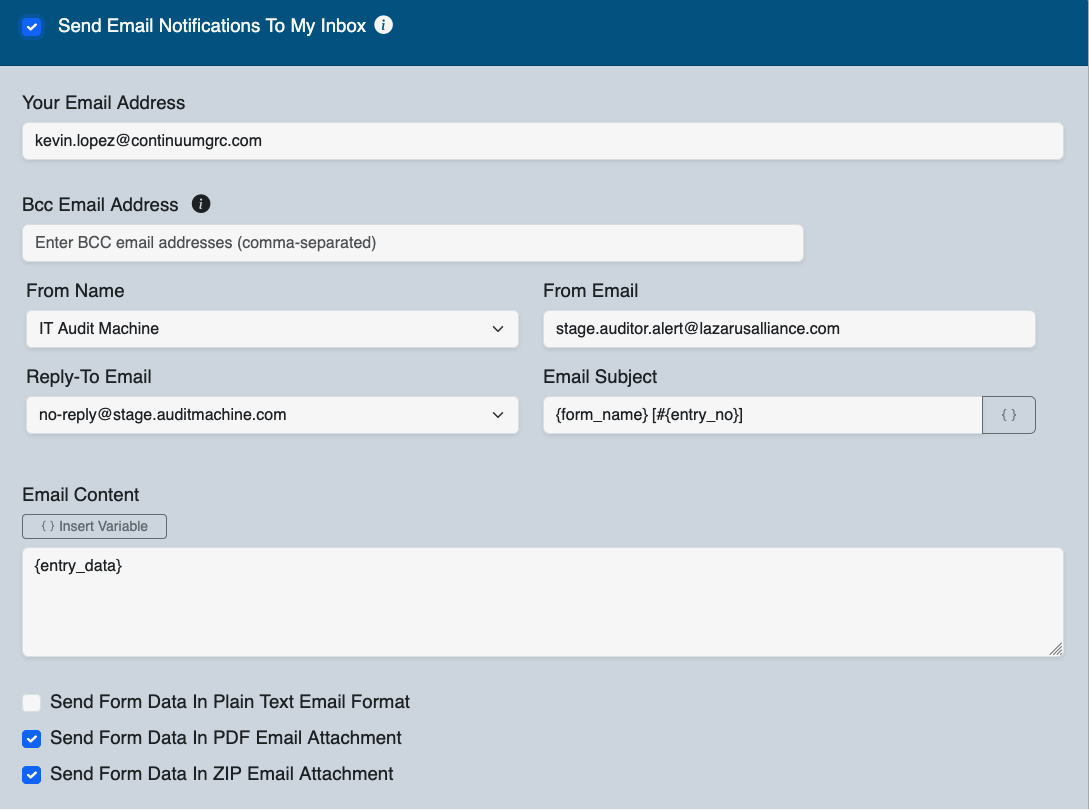
Enable this option to send a receipt copy of the submission to the designated administrator or manager of the specific form, questionnaire, or module. Only the Email Address is required, as the fields are initially configured to send a default message. However, using the More Options link at the bottom of the initial form, you can access additional options for further configuration.
A few special options you may select are:
| Option | Description |
|---|---|
| Send Form Data In Plain Text Email Format | This option includes a text version of the module’s data submission, sent as a prepared email message to all listed recipients. |
| Send Form Data In PDF Email Attachment | This option includes a PDF version of the module’s data submission, along with a prepared email message, sent to all listed recipients. |
| Send Form Report Data In Zip Email Attachment | This option attaches the module’s template output as a Zip file to a prepared email message for all listed recipients. |
Send a Confirmation Email to the User
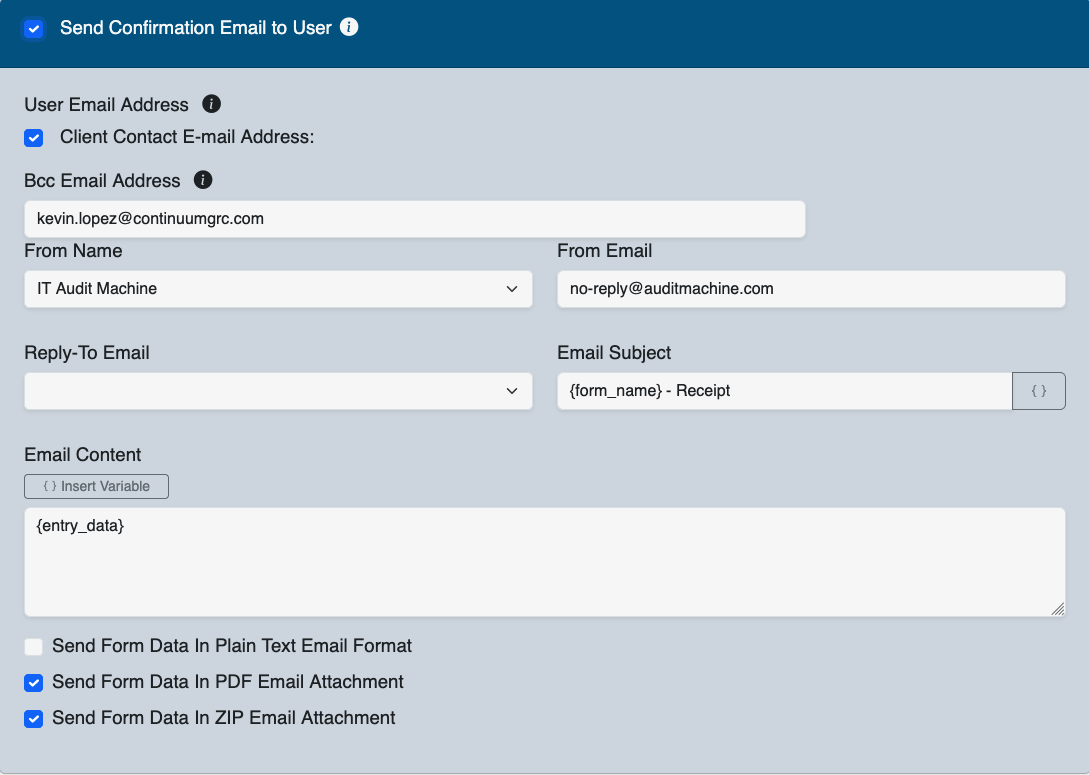
If you want your users to receive a copy of their submission as a receipt when they submit a form, the “Send Confirmation Email to User” option is designed for that.
Note: Your form must include an email field to use this option.
If the form includes an email field, it will appear as an option for sending the email. If the form does not include an email field, the system will notify you that an email field is required, and you will be unable to customize the notification type until you add one.
Similar to Notification Emails for Administrative Users, you can send a default email with no additional configuration beyond the Email Address; however, you can configure more options by clicking the More Options link at the bottom right of the form.
A few special options you may select are:
| Option | Description |
|---|---|
| Send Form Data In Plain Text Email Format | This option includes a text version of the module’s data submission, sent as a prepared email message to all listed recipients. |
| Send Form Data In PDF Email Attachment | This option includes a PDF version of the module’s data submission, along with a prepared email message, sent to all listed recipients. |
| Send Form Report Data In Zip Email Attachment | This option attaches the module’s template output as a Zip file to a prepared email message for all listed recipients. |
Send Form Data to Another Website
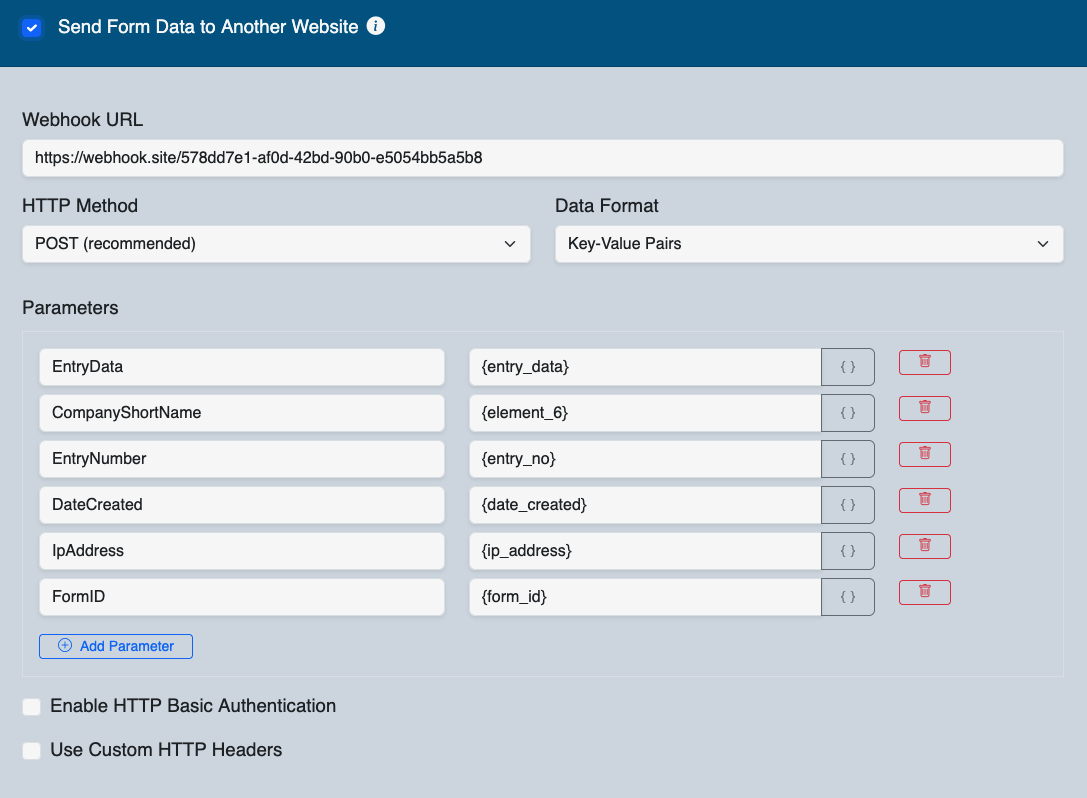
In some advanced cases, your organization may have another web-enabled tool to receive and process data from an ITAM form. The “Send Form Data to Another Website” option lets you configure this type of integration. This is useful for integrating ITAM-captured form data with other web applications, such as Continuum GRC, MailChimp, Salesforce, and Basecamp.
The options available are listed in the following table:
| Option | Description |
|---|---|
| Webhook URL | Place the URL of your integration application here. |
| HTTP Method | This lets you choose between HTTP GET, HTTP PUT, and HTTP POST (recommended) integration methods. Warning: HTTP GET is not recommended for transferring data. It is included as an option as that is the only method available to some users. |
| Use HTTP Authentication | If your integration application requires authentication, then choose this option. |
| HTTP User Name | If your integration application requires authentication, then enter the account that will be used. |
| HTTP Password | If your integration application requires authentication, then enter the password that will be used. |
| Use Custom HTTP Headers | If you need to send custom headers to your integration application, choose this option. |
| HTTP Headers | A JSON object of all HTTP Headers you need to send. When first enabled, the field will display some existing headers as name-value pairs in JSON format. You can add your headers and values to the list. Make sure you separate each pair with a comma. |
| Data Format | This option lets you be very specific with the data elements you integrate with your external web application. |
| Send Key-Value Pairs | These are predefined data elements. |
| Send Raw Data | Enter any content you would like to send here. You can use any data format (JSON, XML, or raw text). Just make sure to set the proper ‘Content-Type’ HTTP header. |
| Name | You can type any parameter name you prefer here. |
| Value | This parameter should be the template variable of the field you would like to send. Such as {element_1} or {element_2}, etc. You can also enter any static value you use. |
| Parameters | This option allows you to specify which data elements you want to integrate with your external web application. |
Note: You can insert template variables into parameter values or data. A template variable is a unique identifier that is automatically replaced with data entered by a user in the related form. Copy the variable name (including curly braces) into your email template. You can insert template variables into the Email Subject and Email Content.
Send Administrative Notices and Reminder Notices to User
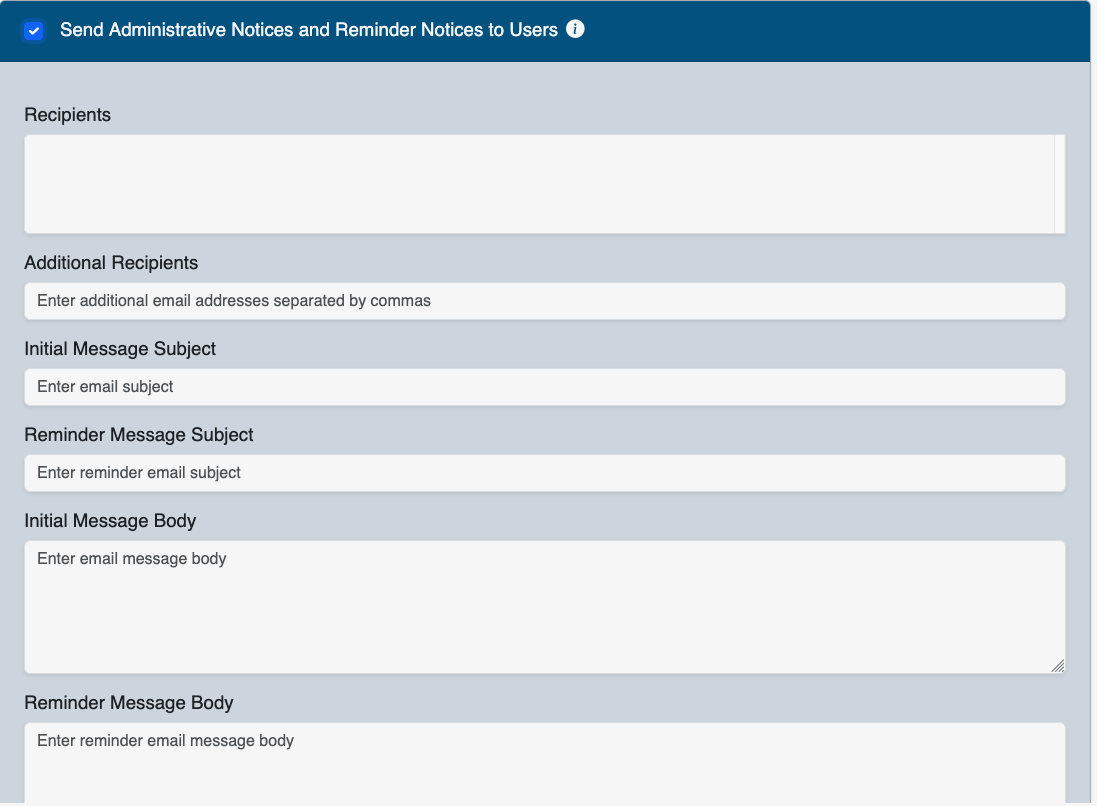
Completing a form in ITAM, especially compliance-related forms, often involves tracking down paperwork or Subject Matter Experts (SMEs) to identify the required data. Sending reminders is one of the best ways to keep the effort top of mind and keep the process moving. The “Send Administrative Notices and Reminder Notices to User” option allows you to automatically nudge the user until the form is completed.
Like sending a regular email to another person or a distribution group, the IT Audit Machine’s powerful messaging system lets you schedule these messages.
The options available are listed in the following table:
| Option | Description |
|---|---|
| Recipient | Select the entities to whom you are going to send notifications. |
| Additional Recipients | Enter the additional recipient’s or group’s email addresses. Simply separate them with a semicolon or a comma. |
| Initial Message Subject | Include a meaningful subject line for your recipients, as you would in a regular email message. This subject is used when the first email for this form is sent to an Entity. |
| Initial Message Body | Include a meaningful message to your recipients in the body of the email, as you would in a regular email. This email body is used when the first email is sent out to an Entity for this form. |
| Reminder Message Subject | Include a meaningful subject line for your recipients, as you would in a regular email message. This subject is used when reminder emails are sent to an Entity for this form. |
| Reminder Message Body | Include a meaningful message for your recipients in the message body, just as you would in a regular email. This email body is used when reminder emails are sent to an Entity for this form. |
| Following Up Days After The Initial Notification | Enter the number of days the system will wait before sending out a follow-up notification. |
Notification Frequency | |
| One Time | Use the One Time option when you want to send an Administrative Notice to your recipients once. Select the date the action will occur. |
| Daily | Use the Daily option when you want to send an Administrative Notice to your recipients every day. |
| Weekly | Use the Weekly option when you want to send an Administrative Notice to your recipients once a week. Select the day of the week the action will occur. |
| Monthly | Use the Monthly option when you want to send an Administrative Notice to your recipients every month. Select the date (day of the month) for the action. |
| Quarterly | Use the Quarterly option when you want to send an Administrative Notice to your recipients every quarter. Select the action’s start month and date (day of the month). |
| Annual | Use the Annual option when you want to send an Administrative Notice to your recipients once a year. Select the date (day of the month) and month for the action. |
Ready to build your Roadmap to Risk Reduction?
Call 1-888-896-6207
Call 1-888-896-6207
Start Your Free 14-Day Trial
FedRAMP Certified GRC Platform Featuring the World's First AI Auditor